Friday, May 23, 2014

Shoe Advertisements in the North East Colonies

The topic has come up on a number of forums lately, so I figured it would do well to post some of the research I've been working on lately. I hope to eventually make it through not only all of the newspaper advertisements for ladies shoes in the 18th c., but runaway ads as well. I'm keeping detailed track of the information about each ad knowing that there might be some connections I didn't expect to find. Eventually I plan on using all of the gathered info to write a thesis or book, depending on how life goes, but there's a lot more to be gathered before I reach a point where it's anything other than simple numbers and a few basic conclusions.

I've only covered 1775-83 for the moment. It includes newspapers from New York, New Jersey, Pennsylvania, Massachusetts, Connecticut, Rhode Island, and New Hampshire. I have everything separated by newspaper and colony, but I won't get that detailed at this point. I didn't notice any major differences between these states with the exception of preference between Callimanco or Stuff. And that was minor enough it might be a fluke.

Out of 408 unique descriptions of women's shoes for sale (I didn't count multiples of the same ad run in separate newspapers or dates).

105 Calimanco/Callimanco/Calamanco/Callimancoe
84 Leather
62 Stuff
55 Silk
34 Morocco
17 Satin
12 Cloth
12 Lastings/Everlasting
11 Russell
5 Sattinett
5 Embroidered
3 Hairbine
2 Velvet
1 Tabby

I was very interested by just how many slight variations of wool there were. Adding up to a total 210 of the 408 ads (51%). Leather with 84 (21%). Silk based add up to 78 (19%). Morocco with 34 (8%).

I also noticed part way through (so went back and made note of all) that 82 of the 84 times leather was mentioned it was as "Men's and women's leather shoes", "Men's, women's, & children's leather shoes", or "Women's leather and Callimanco/Stuff/etc. shoes". Only two had women's leather shoes mentioned alone. One a 1778 ad in the Royal Pennsylvania Gazette, the other a 1783 ad for an auction in the New York Gazette.

Red, Green, Blue, and Black were mentioned for Moroccan leather.

Green, Black, & Cloth coloured fabrics were mentioned, Black more than any other.

Pricing was set in 1777 in New York and Massachusetts for women's leather shoes being 6 s. and cloth being 8 s.

Flowered Nankeen and Sarsenet were the most unusual singular fabric references. Stamped and printed leather appear in 1783.

French, cross cut, flat, common, English, and Italian were types of heels found. Hopefully I'll find enough information someday to know exactly what those specify.

Lynn made shoes came up often as well, a very popular "brand" of shoe made in Lynn, Massachusetts. Now that I'm going back further and researching 1764-1774 I'm finding a great story about them I'll have to tell later.

Year by year it was interesting to watch ads surge in cities that were occupied by the British. Not surprising considering they could suddenly import in large quantities again. Both New York and Boston were notable in this. Of course, everything went up in 1783- 128 of the 408 ads were in that year alone. Adding on to that Silk was the most common type in that year- 27 compared to 26 Callimanco and 21 Leather.

Like I said, I'd love to pull more conclusions from what I've found, but I need more before I feel safe doing that. I'll keep expanding the years and looking for trends, but it's going to be a long process! I also need to delve into the VA Gazettes more so than I did before. I have a feeling many references aren't picked up in their search by topic feature. Then there's the runaway ads which will give balance to the possibility that these ads aren't aimed at the common person.

Black glazed wool shoes 1775-80, Snowshill Wade Collection

Blue leather shoes 1775-85, Met Museum

Red Morocco leather shoes 1775-85, Met Museum

Figured Silk shoes 1775-85, Russian Shoe Museum

Black Satin shoes 1775-85, CWF

Tuesday, April 29, 2014

Fitting Regency Gowns

So, rather than bombard you by constantly talking about how amazing Your Wardrobe Unlock'd and Foundations Revealed are and how it would be a travesty to lose their database, I'm going to show you. I've written a number of articles for them including a how-to on 18th century hoops, undergarments of the Regency period, how to solve fitting problems with Regency gowns, and this next month a how-to on making Edwardian bathing boots. I'll be honest, the writers of the articles do get paid ($100), and that does help incline me to write for them. But, the things I write (and others as well) are far above and beyond in time and money compared to regular blog posts. You all know what sorts of things I regular put up, but if you haven't subscribed to those sites, you don't know what articles you're missing out on.

After six months the writers are allowed to post their articles publicly. It may seem surprising that the articles aren't all over the internet for free then. At least when it comes to my decision not to release them later, it's specifically to support the site. And even if the articles were out there, it'd take an awful lot of searching to find them all! But, this one time, I'm going against that plan specifically to support the site. They lost a lot of subscribers recently due to a change in payment systems and are set to shut down if they don't get them back. So, in hopes that you'll agree that having a site full of hundreds of articles like this is worth the $19.97 a month for access to BOTH sites (half that if you're a student, senior, or registered disabled) I'm putting up the first half of one of my most in-depth and popular articles. I'll post the second half later, but it's too long to do in one post- if you want to read it all now you know what to do!


The most difficult part of any garment construction is perfecting the fit.  Even in Regency period gowns, with their simple and geometric shapes pulled in by drawstrings, there are many issues that commonly appear.  Women have lost the understructure of the Georgian period, which allowed for a flat cone to smooth the fabric over, instead dealing with complex curves.  While there is, of course, a wide variety of styles and body shapes that affect this fit, we’ll try to address some of the common issues.

First, we take a look at portraits of the period.  Some artists are kind enough to put in a great deal of detail when it comes to wrinkles, folds, and seams.  Occasionally, we find what we might even term “mistakes” with fitting.
The portrait of Martha Arbeneva is a good example of a turn of the century style gown, circa 1798 (1).  Particularly note how the neckline crosses, how the gathers fall, and where the shoulder seam is placed.

Comtesse Regnault is also from the turn of the century, 1799, but is wearing quite a different style (2).  The neckline shape is important in this portrait, especially showing where the gathers and fullness are.

Charlotte Ulrike Rosencrantz brings us up to 1805 (3).  Her bodice is much more smoothly fitted, with only a slight gathering in the center front.  Her gown skirt has slight pulling towards the back, but there appears to be a seam or a small pleat on the very side to help keep this from being too severe.  You can also see how her long sleeves are not fitted too snug.

Mrs. Harrison Gray Otis, 1809, has a more narrow point to her rounded neckline (4).  Notice how the sheer gathers are not pulled tight to the bust, but almost droop.

Caroline Murat is a fine example of how a heavier fabric gown (in this case I would say a satin) should fit, circa 1812 (5).  Her gown is also to the edge of her shoulder, necessitating a perfect fit to keep them from falling off.

The portrait of Madame de Staël, also 1812, appears to show a gown without a waist seam, using a belt to hold it in (6).  The gathering in around the neckline also continues all the way over the shoulder.

Marguerite-Charlotte David, 1813, has a very simple straight front (7).  The top appears to have a drawstring, which pulls the neckline in just enough to prevent gaping.  The bodice is not heavily gathered, but is not tightly fitted either.  There do not appear to be shoulder straps either, despite the fact that her neckline looks decidedly narrower than Caroline Murat’s.

Anna-Maria Magnan’s portrait, 1814, is a wonderful example of a flat-fit, covering bodice (8).  The stripes indicate that there is no gathering or darting under the bust to fit the curves.  Instead, we see a slightly puckering under the arm, similar to where darts might be place on modern garments.


Vogelstein’s Junge Dame, from 1816, gives us a rare glimpse of the back of her gown (9).  This side view shows how the tilt of the waistline raises towards the back.

Boilly’s Portrait of a Lady is from 1820, but shows a similar gathered front to many of our earlier portraits (10).  Although, her shoulders are set much wider, the neckline is where the armscye sat a few years before.


Next, there are the fitting issues that commonly arise.  Fit can be affected by a number of things including fabric, undergarments, construction techniques, and the shape/pattern used.  For this article, we’ll focus on the shapes and patterns. 
Even if working from a general pattern, always make a mock-up first.  Keep in mind that your mock-up fabric may differ in weight or stretch (i.e. if using muslin, but making a silk gown, know the silk won’t give as much).

Bodice issues:
Gaping neckline or Wrinkles under the arm. 
Everyone has a different shape of shoulder, our two models are perfect examples of that.  Karen has sloped shoulders and is more likely to have problems with wrinkles under the arm.  Gwendolyn has square shoulders and is more likely to deal with gaping of the neckline.  This doesn’t mean the problem is exclusive to either, however. 

In image 11 we can see how much gaping there is on the neckline of Karen’s bodice.  This has nothing to do with her shoulders.  

We can attempt to fix it by pulling the excess into the waistline (12), but the gathers are not flattering, and the neckline is still loose.  

Image 13 shows how the bodice should fit, close to the bust along the front, with gathers that continue over the bust line, like the portrait of Martha Arbeneva above.  

The difference is the grain line (14).  The gaping bodice is cut with the straight of grain parallel to the center front line of the body, while the fitting bodice is cut with the neckline on grain.

Image 15 shows a simple bodice on Karen with wrinkles under the arm.  We saw in the portrait of Anna Maria Magnan that this is sometimes acceptable, particularly because her bodice covers up to the neckline and has no fitting under the bust.  However, it can easily be fixed in a bodice style that uses gathers or darts under the bust or has a shoulder strap.  

In Karen’s case, the shoulder strap can be very simply adjusted to remove the excess fabric (16).  

Karen has sloped shoulders, so curving the shoulder outward will fix the problem (17).

Gwendolyn can have similar issues as well.  With a bodice shape such as Anna Maria Magnan’s, there is an option of keeping the wrinkle under the arm or using a dart or gathering to take out the fullness (18 & 19).

A common problem in open neck bodices is gaping around the neckline.  This is often caused by the shape and angle of the shoulder strap.  Gwendolyn’s square shoulders need a very straight strap, unlike Karen who had wrinkles under the arm with that shape of strap.  In image 20, the neckline is not an uneven shape, her right side is gaping out almost an inch.  

You can see the minor difference in the pattern which affects this (21).


Darts/Gathers in wrong place
Darts, if the wrong size or shape can give the illusion of a very strangely shaped bust. Too short, and the bodice will look saggy. Too long, and the bust will be flattened. Too much fabric taken in and you’ll have the 1950s cone shape. Not enough and the underbust will be loose or the bustline will be too small. Simply, do these on the body, an easy adjustment to a mock-up even without a fitting partner.


Gathers are very easy to adjust back and forth as well.  If they are to provide fullness to curve over the bust, make sure to spread them out properly (22).  

If placed too close to center it becomes too snug around the outside bust, even beginning to make horizontal wrinkles across it (23).  And it also seemed to have more of a tendency to gap.


To come: gathered neckline pulling, wrong waistline angle or gaping under bust, sleeve issues of shallow top, narrow top, restricted movement, and skirt issues of pulling across the front. I then break down the gowns I've made and how they do and don't fit right.

Friday, April 25, 2014

Lemon Sack

The last few weeks have been a whirlwind of projects with due-dates, not all for me. That's settled down finally and I'm getting some work done on a huge project I'll be posting about sometime in the next month or so. In the mean time, I've made quite a few things this year I haven't posted about yet (and even a few last year... oops). First up is my first Sack gown. You heard me, I've never made the infamous Robe á la Française before. This was one of the best challenges I've had in a while. I've made similar garments such as a Brunswick, but the fitting still required a lot of change. All of which I fitted to myself, and had no reason to, so that was stupid and difficult. Also, with a deadline for the Millinery conference earlier this year.

Moving on, you may find this gown a little familiar. It's actually recycled from one of the first 18th century style gowns I've ever made. I had almost four yards left over after construction. That got used for the two back panels and bodice, the skirts of the previous gown for the front skirts. The petticoat required some piecing in back to get the right height. Fortunately I had used a large hem, so I managed to get some extra length out of that. I still have the sad, machine stitched bodice of the old gown in a basket. Just can't get rid of it yet. That's also pretty much all that's left of the fabric after trimming!

I used a combination of my old gown shapes along with the pattern for the 1770s gown in Patterns of Fashion. This type of striped silk seemed to be very popular for sack gowns in the 1770s, even more so in yellow. I ended up using this gown at the Met museum as trim inspiration. Underneath for support I have a pair of side hoops. Yet another thing I need to remake- I wrote an article about that topic for YWU and need to do a correct pair now! I do have a larger hoop, but I needed to fit in the car.


I originally planned on doing ties or lacing across, but didn't like how that worked without the cut out in the lining. So, I stitched the seam up and can't gain anymore weight.

The stomacher is the only part that has "interfacing", in this case buckram. Buttonholes really require some sort of reinforcement.

I spent literally days looking for lace for sleeve and neck ruffles. I just couldn't find what I wanted. So, I grabbed some cotton from the stash and did a scalloped buttonhole stitch in silk around the edges. I'd like to make nicer ones at some point, but I don't think I'll be crazy enough to embroider them myself after that.

All of the edges of the trim were pinked. The gathering was done by folding along the line and whipping over it from the inside. It gives a nice fullness. For the puffs I actually inserted stuffing!

You can't have a grand gown without the hair. I seriously wish I had Kendra's book, though. I had about shoulder length hair at this point in time (mostly chopped off now). So, I needed some extra pieces.
The front has a rat- just a cutoff leg from pantyhose similar to my hair color filled with stuffing.

The back literally has three pieces made from one very large weft. I had to dye the hair slightly to get it more "golden" since when I bought it I was platinum. You can see how I curled a little of my own hair to finish off the top edge.

I had no clue what to do with the back and even less time, so the quick loop was the best option! I finished it off with hair powder from Little Bits (grey) and some paper flowers.

Wednesday, March 5, 2014

Studying Extants

Most museums follow a pretty standard set of protocol when working with their collections. You wear gloves, handle as little as possible, use a pencil instead of a pen, etc. In reference to gloves I recommend reading this article. Many museums are moving from cotton to nitrile and it doesn't hurt to be ahead of the curve (or bring both) when visiting a collection. The most extreme situation I've dealt with so far was no touching of the item (the curator could move it occasionally for me), the interior stuffing could not be removed, and no mechanical pencils or erasers. That last part does make sense since those broken off bits can infest a clean area pretty easily. So, I bring art pencils, and lots of them. No temptation to erase that way! On the other hand I've handled things with bare (clean) hands and even used pen to trace something out on top of the object once when pencil didn't work. The horror! Either way, you need to keep that basic standard in your mind and make sure to ask in great detail what each museums policy is. Or, private collector, as is the case with what I'm showing you.
My kit now includes both types of gloves, art pencils, 11x14 paper, measuring tape, dental mirror, small flashlight, calipers, tweezers, and an eraser to clean up the drawings afterwards.
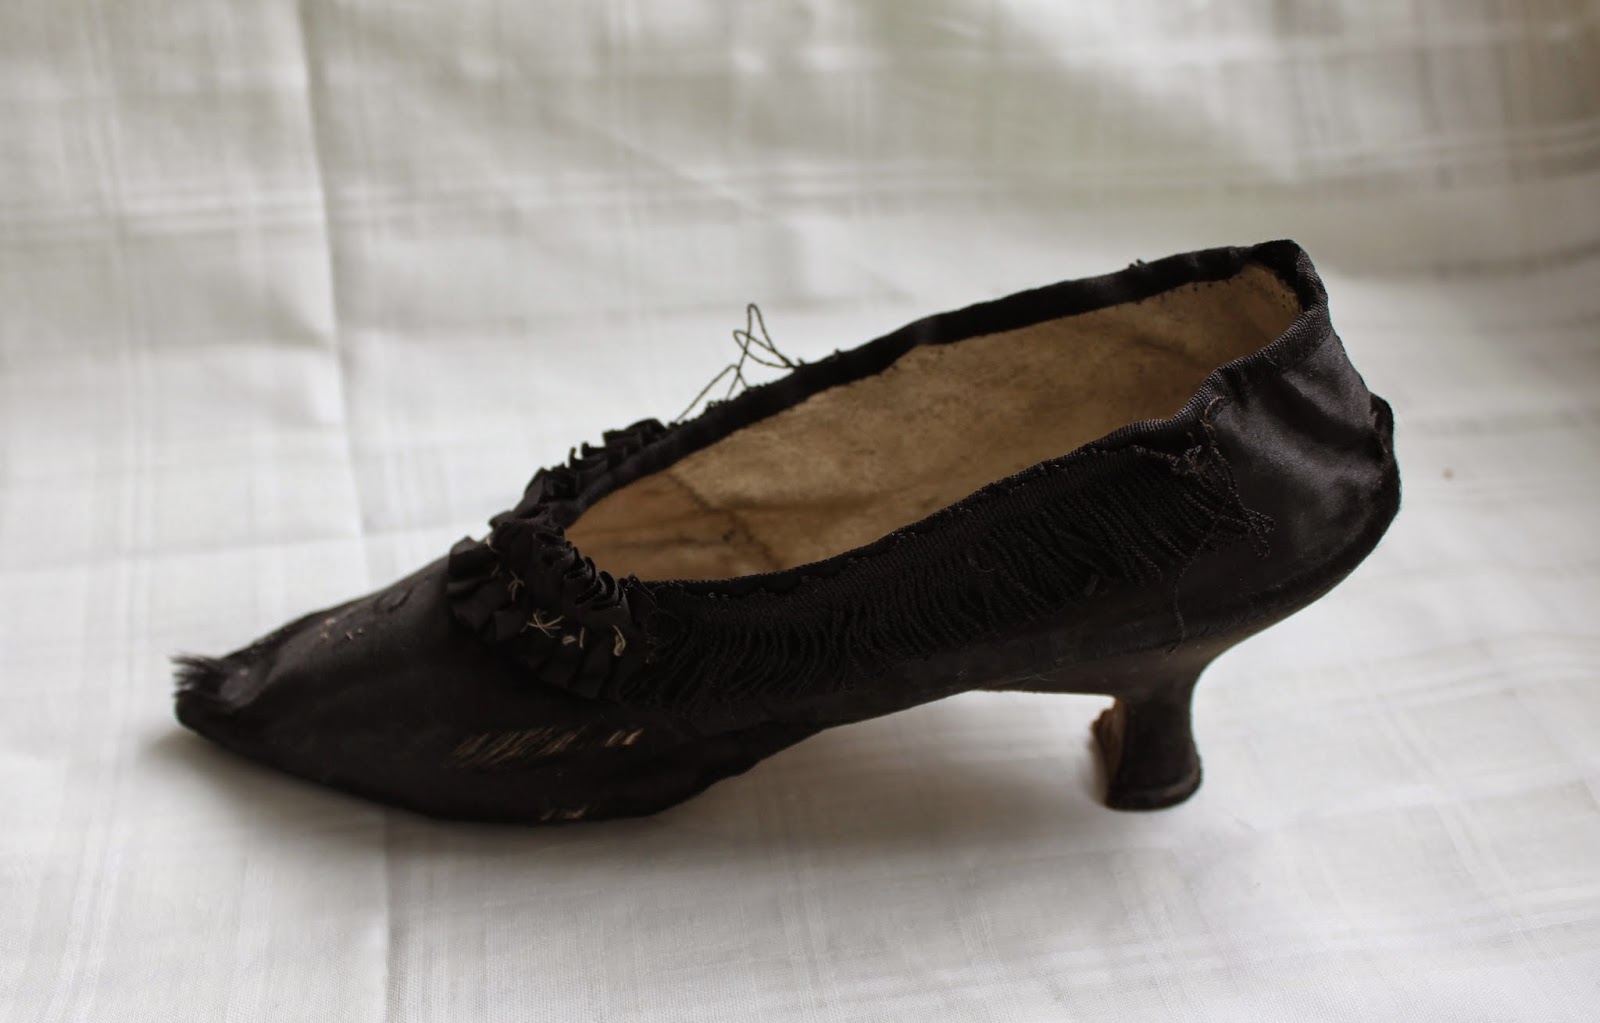
This shoe I'm allowed to move onto the paper and manipulate as need be. A measuring tape can be used to transfer the details in lieu of tracing. It takes longer, but it's much less risky to fragile objects. When moving the shoe I place my hand in the open space under the sole. The uppers and heel are far more fragile than the sole and it should be lifted by its strongest point.

While there will be multiple angles drawn out, the first I start with is the side angle. Gently laying the shoe on the paper (11x14) and tracing roughly around it. The notes at the top right so far tell me my initials, the drawing number (changes over each year), and the accession number or location of the object.

I then go and fill in all of the visual details. I draw to scale as much as possible, using a measuring tape or calipers.

Then, the most important part- notes. I can't stress how much information you need to write down. More than anything I learned this working on the Marquee. Making something that large stitch for stitch meant we needed to note an absurd amount- down to where and how binding was pieced, what angles the stitches were, the size of the thread, etc. Imagine re-creating the object and walk through what you'll need to know for each step. You may not have access to pictures or the object ever again.

I did drawings from other essential angles and of the details. Since this point I've added more notes: the binding meets CF and is butted and whipped, the fringe is running stitched on 3 spi not showing on the inside, how many threads per inch in the linen, and the dating that is probably around 1785. I'm sure I will continue to think of more things, but this now gives me a standard set of questions I could develop to apply to every shoe I look at. Fortunately, this is in my collection, so I can reference it as often as need be. It also means I can show you plenty of images of it.


I wish I knew what museum had de-accessioned this, but it's not a numbering system I'm familiar with. It's a bit of a sad shoe, with the silk shattering and the fringe falling apart. But, that makes it perfect for study. I can see the whittaw reinforcements through the holes, count the exposed stitches where the fringe once was. I do wish I knew what was once attached to it's vamp, but that will take some study and an educated guess I think. My next step with this shoe is to create a custom bag to keep the shape inside and use conservators thread to tack the fringe back together.