Monday, June 23, 2014

Fitting Regency Gowns Part II

Part two of Fitting Regency Gowns. Thankfully YWU and FR have been saved, so I give this second part gladly!

Gathered neckline pulling
How much gathering occurs in a neckline and where it is placed can be affected not only by the overall size of the neckline, but the shape as well.  

This particular shape of neckline on Gwendolyn does best when the gathers are concentrated toward the front and do not continue up the shoulders (24).  

If the gathers are spread out, up the shoulders, the armscye becomes very full and wavy(25).  

The reason this doesn’t work is that this bodice shape has a squared neckline, as shown on the right (26).  The bodice on left is made to gather up the shoulders, sloping outward, allowing the gathering to be diagonal toward the underbust rather than horiztonal toward the shoulder.  You’ll see the finished garment of this pattern in the next section.

Wrong waistline angle or Gaping underbust
If the underbust does not have a drawstring in it, it can be difficult to make it snug enough to not gap, particularly in the back.  There is also an issue of the waistline drooping in back, rather than angling up slightly as is appropriate.  

The easiest way that I have found to find the perfect waistline size and angle is to pin a tape around the waist and attach the bodice to it (27).  It’s especially helpful with gathers under the bust to know how much to gather in to.


Sleeve issues:

Shallow Top
If the sleeve head is too short, it can create numerous problems.  It is very likely to pull at the shoulder strap, causing it to gap, wrinkle, or even pull off the shoulder.  

You’ll also see wrinkles angling from under the arm towards the top center (28).  

That means that the underarm is too high compared to the top of the sleeve, most often because the top is too short rather than the bottom being to high (29).  If you dip out the bottom, particularly on a longer or fitted sleeve, this could bring the narrower circumference up higher, making the sleeve too tight.

Narrow Top
If the sleeve head is too narrow it will prevent the arm from raising, pull greatly on the bodice shoulders, and possibly even create horizontal pull marks across the arm (30).  
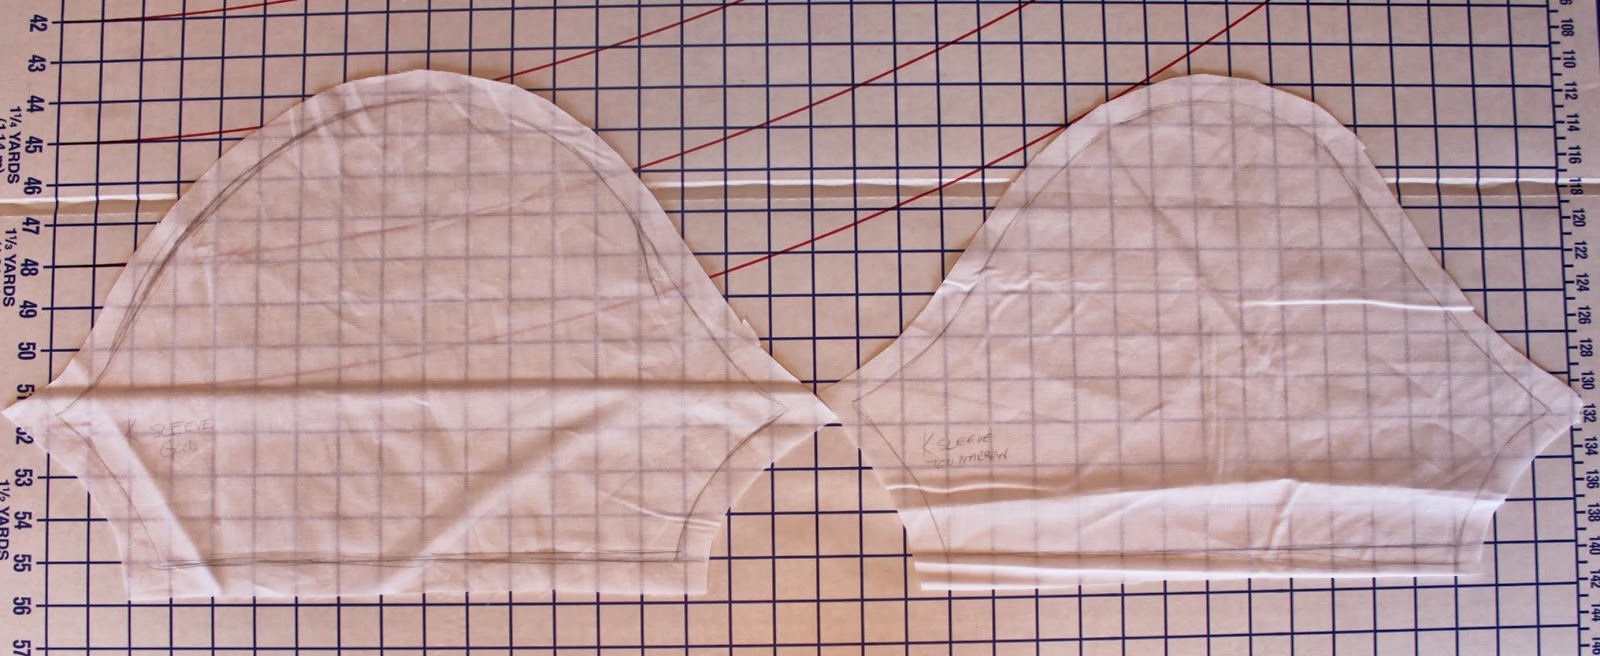
A wider curve, possibly even a flat section along the top, can fix this problem (31).

Restricted movement
Even if the sleeve head does not seem too narrow or too short, there may still be problems with lifting the arm or reaching out in front (32).  It’s very common with fitted sleeves or the narrow backs of the time period.  You could bring your armscye further out on the shoulder or further up under the arm.  However, you don’t have to sacrifice a narrow back or have a seam cutting in under your arm.  

The sleeves can be adjusted to fit, just expect that there will be wrinkles in the back (33).  

This allows the arm to raise up without pulling on the bodice (34).  

Making the back corner more square allows for this (35).

You can also make the sleeve fuller to allow for more movement, or because of style preference.  I generally increase the width of mine from a fitted sleeve one-and-a-half times.  The very simple way of doing this is to take a fitted sleeve pattern which fits you and the gown, then cut it into strips.  

Filling in the lines between the spaced strips will give you a fuller sleeve (36).  Err on the higher side when connecting lines, possibly adding a small allowance to the top and/or bottom of the sleeve to have it “poof” out more.

Skirt issues:

Pulling across front
When flat-fitted fronts are brought all the way around to the back for gathers to begin, there are often wrinkles across the front where the gown is trying to fit over the hips.  There are a few solutions to this issue.  First is to use panels with angled seams.  There are a number of examples of this style in Patterns of Fashion 1 and The Cut of Women’s Clothes.  Another option is to place fullness at the very side, either in the form of a pleat or gathers.  Even though you don’t often see this in portraits, it can be well hidden under the arm.


In this last section I’m going to show four of my gowns from the Regency period and talk about what does, or does not, fit well.

The first is of the style of the 1790s (37).  This is the gown to which the gathered front pattern belongs to above.  The neckline gathers up well, not pulling or placing too much fullness on the shoulders.  Depending on how I move the gathers the neckline can be more round or square.  The main issue comes with the sleeves.  

They are not quite wide enough to fit into such a small back (38).  If my shoulders were set further back, it would be fine.  It would be best (if made again) to move the armscye forward in front and back or to add extra to the sleeve in back.  It’s difficult to fit to a narrow back with fitted sleeves.  The fullness in the front of the skirt means I don’t have to worry about pulling over the hips, although when I tried to place the pleats in back between the seams the fabric wanted to pull the skirt into a tight roll rather than fanning out into a train.

The next gown is based on an 1805 extant (39).  

In this case, the sleeves fit well and allow for great movement, no tightness across the back (40).  Comparing to the original they could have been slightly fuller.  There was a slight gaping under the bust, so I finished the seam with a drawstring.  It only slightly pulls in, so no visible gathers.  The skirt is made up of four pieces; a front with angled sides, two side pieces with only one angled side, and a straight back.  My main issue with the gown is that the front bodice panel should have been wider.  It pulls snug across the bust and the original seems to be looser to allow the center front to drape down slightly.  I place a gathering cord center front to pull it down, but it does not want to easily.

Third is an 1812 style (41).  

I have no major issues with this one, but having a drawstring across the front neck and the back, gathered sleeves, wide back, and a snug waistband make for an easy fit (42).  This skirt was also made with angled pieces (as you can see from the stripes), but there is also gathering around all but the very front of the bodice.


The last is based on a fashion plate from 1816 (43).  I am still in the process of building this one and working out the kinks.  The sleeves will be drawn up (as the left one is), but this shows you the overall length and size of a fuller sleeve.  My main issues come with the bodice front and undergarments.  I originally draped this bodice to go over a corset, however, the straps of the gown were set too far out and showed the corset straps and shift neckline.  I might have to adjust the darts later once I find the right style to hide underneath.  The other issue is that the stripes need to run vertically, but this can be a problem with crossed necks.  I had to adjust the waistline of the bodice down to keep the neck from gaping, but this puts annoying pulls horizontally.  

The skirt does fit well, owing to a 2” pleat on either side, just under the arms.  I am thinking about making this pleat deeper to fix the slight pull seen in the back view (44).  However, it has yet to be hemmed and I want to see what happens when the hem is free from the floor.

When constructing a garment, search through as many sources as possible.  Look at period artists, particularly Sir Thomas Lawrence, Louise Élisabeth VigĂ©e Le Brun,  Vladimir Borovikovsky, Gilbert Stuart, Jacques-Louis David, and Henry Raeburn.  Fashion plates can be useful, but they lack detail; particularly of wrinkles, darts, and seams.  And, as always, look to other costumers garments for their triumphs and tribulations.

Friday, May 23, 2014

Shoe Advertisements in the North East Colonies

The topic has come up on a number of forums lately, so I figured it would do well to post some of the research I've been working on lately. I hope to eventually make it through not only all of the newspaper advertisements for ladies shoes in the 18th c., but runaway ads as well. I'm keeping detailed track of the information about each ad knowing that there might be some connections I didn't expect to find. Eventually I plan on using all of the gathered info to write a thesis or book, depending on how life goes, but there's a lot more to be gathered before I reach a point where it's anything other than simple numbers and a few basic conclusions.

I've only covered 1775-83 for the moment. It includes newspapers from New York, New Jersey, Pennsylvania, Massachusetts, Connecticut, Rhode Island, and New Hampshire. I have everything separated by newspaper and colony, but I won't get that detailed at this point. I didn't notice any major differences between these states with the exception of preference between Callimanco or Stuff. And that was minor enough it might be a fluke.

Out of 408 unique descriptions of women's shoes for sale (I didn't count multiples of the same ad run in separate newspapers or dates).

105 Calimanco/Callimanco/Calamanco/Callimancoe
84 Leather
62 Stuff
55 Silk
34 Morocco
17 Satin
12 Cloth
12 Lastings/Everlasting
11 Russell
5 Sattinett
5 Embroidered
3 Hairbine
2 Velvet
1 Tabby

I was very interested by just how many slight variations of wool there were. Adding up to a total 210 of the 408 ads (51%). Leather with 84 (21%). Silk based add up to 78 (19%). Morocco with 34 (8%).

I also noticed part way through (so went back and made note of all) that 82 of the 84 times leather was mentioned it was as "Men's and women's leather shoes", "Men's, women's, & children's leather shoes", or "Women's leather and Callimanco/Stuff/etc. shoes". Only two had women's leather shoes mentioned alone. One a 1778 ad in the Royal Pennsylvania Gazette, the other a 1783 ad for an auction in the New York Gazette.

Red, Green, Blue, and Black were mentioned for Moroccan leather.

Green, Black, & Cloth coloured fabrics were mentioned, Black more than any other.

Pricing was set in 1777 in New York and Massachusetts for women's leather shoes being 6 s. and cloth being 8 s.

Flowered Nankeen and Sarsenet were the most unusual singular fabric references. Stamped and printed leather appear in 1783.

French, cross cut, flat, common, English, and Italian were types of heels found. Hopefully I'll find enough information someday to know exactly what those specify.

Lynn made shoes came up often as well, a very popular "brand" of shoe made in Lynn, Massachusetts. Now that I'm going back further and researching 1764-1774 I'm finding a great story about them I'll have to tell later.

Year by year it was interesting to watch ads surge in cities that were occupied by the British. Not surprising considering they could suddenly import in large quantities again. Both New York and Boston were notable in this. Of course, everything went up in 1783- 128 of the 408 ads were in that year alone. Adding on to that Silk was the most common type in that year- 27 compared to 26 Callimanco and 21 Leather.

Like I said, I'd love to pull more conclusions from what I've found, but I need more before I feel safe doing that. I'll keep expanding the years and looking for trends, but it's going to be a long process! I also need to delve into the VA Gazettes more so than I did before. I have a feeling many references aren't picked up in their search by topic feature. Then there's the runaway ads which will give balance to the possibility that these ads aren't aimed at the common person.

Black glazed wool shoes 1775-80, Snowshill Wade Collection

Blue leather shoes 1775-85, Met Museum

Red Morocco leather shoes 1775-85, Met Museum

Figured Silk shoes 1775-85, Russian Shoe Museum

Black Satin shoes 1775-85, CWF

Tuesday, April 29, 2014

Fitting Regency Gowns

So, rather than bombard you by constantly talking about how amazing Your Wardrobe Unlock'd and Foundations Revealed are and how it would be a travesty to lose their database, I'm going to show you. I've written a number of articles for them including a how-to on 18th century hoops, undergarments of the Regency period, how to solve fitting problems with Regency gowns, and this next month a how-to on making Edwardian bathing boots. I'll be honest, the writers of the articles do get paid ($100), and that does help incline me to write for them. But, the things I write (and others as well) are far above and beyond in time and money compared to regular blog posts. You all know what sorts of things I regular put up, but if you haven't subscribed to those sites, you don't know what articles you're missing out on.

After six months the writers are allowed to post their articles publicly. It may seem surprising that the articles aren't all over the internet for free then. At least when it comes to my decision not to release them later, it's specifically to support the site. And even if the articles were out there, it'd take an awful lot of searching to find them all! But, this one time, I'm going against that plan specifically to support the site. They lost a lot of subscribers recently due to a change in payment systems and are set to shut down if they don't get them back. So, in hopes that you'll agree that having a site full of hundreds of articles like this is worth the $19.97 a month for access to BOTH sites (half that if you're a student, senior, or registered disabled) I'm putting up the first half of one of my most in-depth and popular articles. I'll post the second half later, but it's too long to do in one post- if you want to read it all now you know what to do!


The most difficult part of any garment construction is perfecting the fit.  Even in Regency period gowns, with their simple and geometric shapes pulled in by drawstrings, there are many issues that commonly appear.  Women have lost the understructure of the Georgian period, which allowed for a flat cone to smooth the fabric over, instead dealing with complex curves.  While there is, of course, a wide variety of styles and body shapes that affect this fit, we’ll try to address some of the common issues.

First, we take a look at portraits of the period.  Some artists are kind enough to put in a great deal of detail when it comes to wrinkles, folds, and seams.  Occasionally, we find what we might even term “mistakes” with fitting.
The portrait of Martha Arbeneva is a good example of a turn of the century style gown, circa 1798 (1).  Particularly note how the neckline crosses, how the gathers fall, and where the shoulder seam is placed.

Comtesse Regnault is also from the turn of the century, 1799, but is wearing quite a different style (2).  The neckline shape is important in this portrait, especially showing where the gathers and fullness are.

Charlotte Ulrike Rosencrantz brings us up to 1805 (3).  Her bodice is much more smoothly fitted, with only a slight gathering in the center front.  Her gown skirt has slight pulling towards the back, but there appears to be a seam or a small pleat on the very side to help keep this from being too severe.  You can also see how her long sleeves are not fitted too snug.

Mrs. Harrison Gray Otis, 1809, has a more narrow point to her rounded neckline (4).  Notice how the sheer gathers are not pulled tight to the bust, but almost droop.

Caroline Murat is a fine example of how a heavier fabric gown (in this case I would say a satin) should fit, circa 1812 (5).  Her gown is also to the edge of her shoulder, necessitating a perfect fit to keep them from falling off.

The portrait of Madame de StaĂ«l, also 1812, appears to show a gown without a waist seam, using a belt to hold it in (6).  The gathering in around the neckline also continues all the way over the shoulder.

Marguerite-Charlotte David, 1813, has a very simple straight front (7).  The top appears to have a drawstring, which pulls the neckline in just enough to prevent gaping.  The bodice is not heavily gathered, but is not tightly fitted either.  There do not appear to be shoulder straps either, despite the fact that her neckline looks decidedly narrower than Caroline Murat’s.

Anna-Maria Magnan’s portrait, 1814, is a wonderful example of a flat-fit, covering bodice (8).  The stripes indicate that there is no gathering or darting under the bust to fit the curves.  Instead, we see a slightly puckering under the arm, similar to where darts might be place on modern garments.


Vogelstein’s Junge Dame, from 1816, gives us a rare glimpse of the back of her gown (9).  This side view shows how the tilt of the waistline raises towards the back.

Boilly’s Portrait of a Lady is from 1820, but shows a similar gathered front to many of our earlier portraits (10).  Although, her shoulders are set much wider, the neckline is where the armscye sat a few years before.


Next, there are the fitting issues that commonly arise.  Fit can be affected by a number of things including fabric, undergarments, construction techniques, and the shape/pattern used.  For this article, we’ll focus on the shapes and patterns. 
Even if working from a general pattern, always make a mock-up first.  Keep in mind that your mock-up fabric may differ in weight or stretch (i.e. if using muslin, but making a silk gown, know the silk won’t give as much).

Bodice issues:
Gaping neckline or Wrinkles under the arm. 
Everyone has a different shape of shoulder, our two models are perfect examples of that.  Karen has sloped shoulders and is more likely to have problems with wrinkles under the arm.  Gwendolyn has square shoulders and is more likely to deal with gaping of the neckline.  This doesn’t mean the problem is exclusive to either, however. 

In image 11 we can see how much gaping there is on the neckline of Karen’s bodice.  This has nothing to do with her shoulders.  

We can attempt to fix it by pulling the excess into the waistline (12), but the gathers are not flattering, and the neckline is still loose.  

Image 13 shows how the bodice should fit, close to the bust along the front, with gathers that continue over the bust line, like the portrait of Martha Arbeneva above.  

The difference is the grain line (14).  The gaping bodice is cut with the straight of grain parallel to the center front line of the body, while the fitting bodice is cut with the neckline on grain.

Image 15 shows a simple bodice on Karen with wrinkles under the arm.  We saw in the portrait of Anna Maria Magnan that this is sometimes acceptable, particularly because her bodice covers up to the neckline and has no fitting under the bust.  However, it can easily be fixed in a bodice style that uses gathers or darts under the bust or has a shoulder strap.  

In Karen’s case, the shoulder strap can be very simply adjusted to remove the excess fabric (16).  

Karen has sloped shoulders, so curving the shoulder outward will fix the problem (17).

Gwendolyn can have similar issues as well.  With a bodice shape such as Anna Maria Magnan’s, there is an option of keeping the wrinkle under the arm or using a dart or gathering to take out the fullness (18 & 19).

A common problem in open neck bodices is gaping around the neckline.  This is often caused by the shape and angle of the shoulder strap.  Gwendolyn’s square shoulders need a very straight strap, unlike Karen who had wrinkles under the arm with that shape of strap.  In image 20, the neckline is not an uneven shape, her right side is gaping out almost an inch.  

You can see the minor difference in the pattern which affects this (21).


Darts/Gathers in wrong place
Darts, if the wrong size or shape can give the illusion of a very strangely shaped bust. Too short, and the bodice will look saggy. Too long, and the bust will be flattened. Too much fabric taken in and you’ll have the 1950s cone shape. Not enough and the underbust will be loose or the bustline will be too small. Simply, do these on the body, an easy adjustment to a mock-up even without a fitting partner.


Gathers are very easy to adjust back and forth as well.  If they are to provide fullness to curve over the bust, make sure to spread them out properly (22).  

If placed too close to center it becomes too snug around the outside bust, even beginning to make horizontal wrinkles across it (23).  And it also seemed to have more of a tendency to gap.


To come: gathered neckline pulling, wrong waistline angle or gaping under bust, sleeve issues of shallow top, narrow top, restricted movement, and skirt issues of pulling across the front. I then break down the gowns I've made and how they do and don't fit right.