Showing posts with label Regency. Show all posts

Saturday, February 11, 2012

Regency Day Gown

I had sort of planned this outfit a while ago, having all of the fabric in stock, but hadn't planned on making it any time soon.  Then the newly started VA Regency Society contacted me about doing a presentation on Regency fashion.  I needed a good example of a drop-front gown, preferably something I wouldn't freeze to death in like my other gowns.  I pulled out the last bit of camlet mixed cloth I had from B&T and started perusing the books.  I liked the gown in Janet Arnold, but I wanted something closer to 1810.  Fashion in Detail has two very similar gowns that are dated just a little later.  The JA gown was mainly earlier because of the trained hem (something I definitely didn't need or want).  I used the long sleeves of one of the FiD dresses along with it's pleated skirt, taking inspiration from the JA gown for the small tucks on the bodice.
The chemisette is also in both of those books.  The bonnet is based on this one at the Met museum.


I'm hoping to put some gimp trim on the bonnet like the original, but I'd rather find the right stuff than rush it.  I also need to put some extra tacks on the chemisette pleats in back since they are very prone to puffing (the pattern said cut it on a bias....).  It doesn't help that I took off the gown at the talk and didn't properly adjust the chemisette when putting it back on.

Between the two of us, Gwendolyn and I managed quite a timeline of garments!  I still need to make some early 19th century men's wear I can keep around (it's all gone off to clients so far).

Monday, July 18, 2011

Regency Gaming Night

This weekend Gwendolyn and I drove up to Fredericksburg to attend a Regency gaming night at Jenny's (JennylaFleur).  It was a great deal of fun!  We had a small photo session outside before beginning.  There was Cribbage, Whist, and Speculation.  We found our way to the table with Speculation, but I must admit our table eventually dissolved into good conversation.
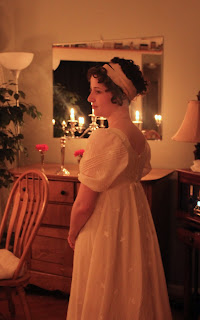
I wore my 1809 Muslin gown.  I rag curled my hair, then used a curling iron to fix up the front portion, wrapped a ribbon around it and pinned a large gold brooch in it.  I wore cameos for jewelry.  I was one of the least sparkly people there, but I'll make up for it at the August event with the 1790s gown!


Photo courtesy of JennylaFleur

Friday, July 1, 2011

1790s Gown

Well, apparently I am just that insane.  I've fixed myself upon making the purple 1790s gown from KCI.  You can find it in both Fashion and Revolutions of Fashion.  Now, I can't reproduce it exactly, seeing as I need it for August and I'm not exceedingly rich.  Figuring that I can use some machine embroidery, a few other short cuts, and try to find comparable materials it should be feasible.  Overall, the effect should be similar.  Frankly, I don't think anyone is going to fault me for using pre-strung sequins or metallic thread instead of real gold.  It's going to sparkle either way!
The first step for me was to break down exactly what was originally used, then try to find an affordable comparison.
First, fabric.  I'm assuming that I won't stumble across a figured purple silk at $20 or less.  So, I found a plain silk taffeta which is fairly similar in color from Renaissance Fabrics.  I happened to already have a swatch of it, so that was the easy part.  There's a small quantity of appliqued pink silk as well, which I  have the perfect taffeta for already.
The long strands of sequins were, of course, hand-stitched on one by one.  Now, I can find pre-stranded 6mm gold sequins for 83 cents a yard on sale at MJ Trim.  I've never had the opportunity to compare modern to antique sequins, but that should do fine.  I also purchased some loose of the same style for the smaller designs.
There is a large quantity of what appears to be small gold beads all over the designs; on the pink silk, inside the leaves, in the middle of sequin flowers, etc.  They look almost like un-flattened sequins.  I found 4mm brass rondelles which look similar.  However, to purchase enough would be between $60-100.  I'm not sure I can justify that much on just one small aspect.  So, I'm trying 4mm cupped gold sequins, since that's only a $10 investment to at least try to make them work.
Then there is the larger border of metal pieces.  They appear to be foil over a black solid ring (wood, resin?).  As much as I would like to remake those, it just isn't practical.  I looked around for 8mm gold/brass pieces that either had two holes or ran through, but what few there were were expensive ($1 a piece or so).  I also found 8mm metal sequins, so I'm trying those out for about $4.
The regular embroidery is done in silk, which makes that very easy.  The metallic feathers are not difficult either.  I'm assuming they were originally a brighter (untarnished) gold.  However, the large swags are done with chenille.  That is certainly not running through a machine, and is difficult to sew even by hand.  I know it needs to have a different finish than the basic silk.  YLI makes a silk thread with metallic wrapped with it, the colors are subtle enough to look akin to the original.  I'm also debating on a wool/acrylic fuzzy blend.  I'm thinking the silk/metallic might look less out of place.  And for all I know my machine can do some sort of chenille stitch (I need to look into that).
There is also the rope belt and large tassels.  MJ Trim also has metallic cord in a nice brown-gold.  I ordered some 1mm for making tassels and 6mm for the main rope.
All together, this is still going to be a very expensive endeavor, but it could be far worse.  I'm hoping to make a full mock-up of the gown today so I can start sketching out the embroidery designs.  That's creating it's own problems, however, in the fact that I can't find an image of the back.  So, I'm making some assumption I'll talk about later.

Sunday, April 10, 2011

Corded Corset

A very simply constructed garment which helps to smooth out and lift the figure under those unforgiving muslin gowns of the early 19th century.
The exterior is a mid-weight cream cotton.  The channels for the cording are back-stitched just like they are for stays.  Gussets are inserted into the bust and top-stitched around (with a spaced stitch).  The binding is of the same fabric, cut on the bias.  There are bones in the very back to keep the lacing from contracting and a removable wood busk in the front.  The embroidery is just a chain stitch.

The interior layer is linen.  The cording is inserted with a large blunt needle (tapestry).  It emerges from the channel every couple of inches, the length of one stitch essentially.  Since the cotton cord I used was fairly small, there are two lengths per channel.  You can see the slit for the busk to be inserted, raw edges just folded back.  There is a drawstring along the top of the bust, although I haven't needed it.  A higher bust line would need it to curve over.

The pattern is extremely simple, consisting of two pieces, with added gores in the bust later.  The side seams mirror each other, with plenty of seam allowance for the first fitting.  The center back curves in to snug up the figure, but the measurements are still what mine naturally are.  No reduction.  There is a 2" space accounted for in the back, since the lacings should not meet.  The pattern I designed for the cording is loosely based on a pair from the Kyoto Museum, along with a few other inspirations.  You can do as much or as little cording as you like.  While it adds thickness, and therefore some structure, it's not integral like boning in stays.  Mine are heavily corded and embroidered, but I chose to do that for visual reasons.


Friday, April 8, 2011

Below the Gown

Undergarments are often a problem in any good historical outfit.  They take as much time as a gown and are never seen.  This means that they are often forgotten and bypassed for sake of time and money.  Even when they aren't, knowing exactly what you need can be difficult.  When I was making up my muslin 1809 gown I already had a full set of undergarments for that time period.  Unfortunately they don't work!  One of the most difficult things about early 19th century is that fact that many gowns are completely see through.  I had a white shift, cream corset, and white underpetticoat.  While they work under my brown gown, I could see a huge color difference and even stitching in my corset.  The straps were also too far in on the shoulder and the back of the shift too high.

Shortly after discovering this dilemma, I received the V&A's Underwear Fashion in Detail.  In it they show a Regency era "bra".  Called a Bust Bodice circa 1800-30.  It had the right neckline, was at the edge of the shoulders, and would match with my underpetticoat.  I put it together very quickly, since it's of very simple design.  Now, it might have worked in a heavier fabric in beige.  However, the white was so vibrant underneath you could still see every seam.  Especially problematic considering the way the seams fall, and it's not exactly opaque on it's own.


My last idea was to make a new underpetticoat that had a bodice attached.  In beige.  In the end, it worked fairly well.  I'd like to adjust the fit of the bodice front if I make myself another at some point, but it's not overly visible under my gown!  There's a drawstring in the neck and under the bust.  The buttons are just covered brass rings, very flat.


Thursday, April 7, 2011

1809 Muslin Gown

I purchased some embroidered muslin a while back, knowing I was going to make a Regency evening gown with it.  But how to make it different than all the other "white" gowns?  I started going through museums looking for ideas and found this gown from the Met, dated 1809.  Line after line of tiny tucks?  Embroidered Dorset buttons?  Sounds perfect!

I adjusted the pattern from my Brown Muslin gown.  I knew the sleeves had to be longer, especially to accommodate the tucks in them.  I wish I had made the front bodice piece wider so it would drape more, but I wasn't going to go back and do all of those tucks again.  The seam under the bodice has a drawstring in it, as do the sleeve hems.

The back isn't quite small enough compared to the original, but much more and it wouldn't be comfortable on me.  I didn't grow up in stays.  I also had a shorter train.  There's still plenty to trip over, but the width of the skirt is enough that I can hold it while dancing and the hem is still to the floor.

 I made covered dorset buttons, embroidering a small motif in the center.  I used some batting inside of the bone ring to keep the back of the button from showing through.

My shoulder straps are a little wide so that I'm not showing my under-petticoat or worrying about it falling off the shoulder.  There are dorset buttons on each of the straps, I used a fake buttonhole behind it.  There's also another button center front to accent the gathered portion of the bodice.

The sleeve has diagonal tucks taken, which intersect in the middle.  I actually had to go back and re-do half a sleeve because I took too large of tucks and the visual just wasn't nearly as elegant.

As always, everything was hand-stitched.  It wasn't a difficult project until I got to the point of trying it on.  I then realized that the fabric was far too sheer to wear the undergarments I had under it (corset, etc).  I ended up making two different undergarments for it because the first one I tried was still far too visible underneath.  But, that will be a separate post.

Friday, March 25, 2011

Regency Evening Gown: Designing

I had some extra time today, so I decided to start on my taffeta 1810s gown.  The question is, what to do with it?  I purchased this silk taffeta a couple of months ago from Burnley & Trowbridge with a general idea of what I wanted.  A gown circa 1812-15 with a decent amount of trimmings, for some reason vandyking came to mind.  It's a pale aqua with a small white pinstripe.
 After a few days of searching, I came across this image.  The gown on the left not only has a very similar fabric, but has all the trimmings I was looking for.  The next challenge was to find more images and extants that resemble it.  Different angles, especially a back on a similar gown, can help to understand the shape.  It also helps to know what makes this gown 1816 distinctly, because I would like to move the date up slightly on style if possible.

This fashion plate is a bit earlier in years, around 1811 I think (I need to go back through a huge database to find that date, ugh).  The neckline crosses over like my drawing, but the shoulder strap width is much wider.  The shoulders also sit up higher.  Less trimming, but it is more of a casual morning dress in style.

This definitely resembles the previous plate, same neckline.  A bit of trim around the neck, sleeves, and hem.  But, more gathering under the bust.

Going even later than my plate, this one being from 1818.  The trimming style is very similar.  The neckline seems to be almost horizontal, however.  Hints that the neckline may be the biggest clue to what makes my plate 1816, rather than an earlier style.  There's no visible shoulder strap, probably just a very tiny 1/4" or so strip the sleeve is gathered to, like this gown.

I don't have the plates to show how I reached the conclusion that the trimming wasn't what made it a later style, since they're in a book.  However, I will at least describe it.  There's one plate from 1811 where the gown has four layers of zig-zag style trim around the hem, rather deep.  The sleeves also have three layers of that same trim.  Another 1811 gown has gathered, pinked trim around the hemline, one high up, another at the hem.  Trim around the neckline is commonly seen throughout the Regency period.  I did find a couple of 1812 images where the neckline is very wide, almost starting off the shoulders, but the v-neck in front reaches all the way up to the top of the shoulder almost meeting the back.  The only trimming I didn't find an earlier facsimile for was the second layer around the bust.  However, I can wait until the garment base is finished to decide if I want that or not.  It may look awful in real life, or just too bare without it.

Problem #2.  Fashion plates don't show the back of most gowns (or if they do, there's no front!).  Figuring out what would be appropriate for that style of neckline is going to fall to the original garments. The problem is, I just can't seem to find any.  There are a few with somewhat similar fronts, but just not quite right.
This original in the Met, from 1810, has the v-neck shape, with a small modesty piece instead of crossing the fronts.  Similar amount of trim and wide neckline.
The back scoops down fairly low, but not extremely.  It fastens with ties.  Possibility for fastening, but rather un-exciting.

This garment, sold by Vintage Textile, has the crossed front like the two earlier plates.

The back is one solid piece, meaning the fastening occurs invisibly on the front somehow.  It also has a scooped neckline though.

And here the mystery is solved.  The front is created with two separate pieces that attach with ties.


This gown, called Hortense, from the Napoleon and the Empire of Fashion exhibit shows a lovely back. I don't know what the front looks like unfortunately (anyone seen it?).  The trimming on the neckline doesn't seem unlike my fashion plate and would be very pretty (and unusual).
I've also seen plates (and an original at the Kyoto museum) that show lacing up the back.  Some plates even show that low v-neck in back, like the Hortense gown, but with a laced up panel behind it.  I honestly still can't decide.  I'm leaning away from the front fastening, because I'm afraid I can't invisibly control that style well enough in front, leaving an open slit on the side, etc.  That leaves me with buttons, the v-neck and/or lacing.  If you've happened across that style of neckline, please let me know.  I'd love to see an original showing what they deemed fashionably appropriate with it!

Tuesday, March 22, 2011

Regency Inside-Out

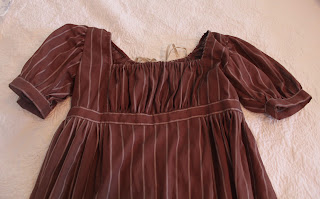
This is by far the simplest garment I think I've ever made.  It has no lining, drawstrings and gathering to adjust fit, and mostly geometrical shapes.  The gown was draped in a B&T workshop, but I've adjusted the pattern for my second muslin gown and will probably do the same for the taffeta.  It's all made from a brown cotton muslin with a small stripe running through it.

The fronts run straight over the shoulders, extending to the back similar to 18th century gowns.  The center front piece is just a long rectangle gathered to the underbust band on bottom and drawstringed on top.  Getting the band measurement correct is really the most specific part of the whole gown.  The front area of the skirt is left flat, some gowns don't start pleats until the half-way point.

Sleeves do have a fair amount of head on them (curve on top), but being gathered in at top and bottom it's more for volume than allowing for movement.  The cuff here is fitted snugly to the arm to keep the "poof" up.  You can choose to drawstring the hem instead.

The back I fastened with hooks and eyes, using the drawstring which starts in the front pieces to tie the very top off.  You can see where the front pieces attach, not terribly far back.  Again, personal choice.  My next gown has a much more severe diamond shape to the back pieces.

I used the underbust band to finish off the edges inside.  The seams I felled, but since the fabric wasn't prone to fraying I left the armscye and the skirt seams raw.  Small eyelets in the front rolled edge and on the left back neck allow the linen tape to exit the channel unnoticed.

There's no easy way to photograph it, but you can see at least one skirt seam here.  The skirt is made of four pieces.  The front angles out toward the hem, the two side pieces have one straight edge at the front and a more severely sloped back edge, the back piece is rectangular with an opening slit cut in the center back.  It's just one way to do it, you can use as few or as many as you would like in reality.  The top needs to be smaller than the hem unless you want to look extra poofy and there needs to be some angling out at the hips (or pleating over the sides).  I don't recall measures of this gown skirt or the other muslin, but I'll be sure to keep track on the taffeta.  Some of it depends on the fabric width.

I threw together a pair of long sleeves the morning of the event.  I simply measured the sleeve band and my wrist for width (loosely at the wrist so the hand can fit through).  It flares out 1" after the wrist to fit long over the hand.  Very simple shape with only one seam which quickly whips to the permanent sleeve bands.  Making it on the diagonal allowed for a tighter wrist fit.