Showing posts with label Jacket. Show all posts

Friday, September 23, 2011

Sailing Away

I apologize for this being fairly short, I'm still exhausted!
I just returned from a trip to Disney World and a short cruise on the Disney Dream.  Usually, neither of these warrants a costume post, however, seeing as I was in DW when they started their Halloween party and I managed to squeeze making two outfits in for the cruise, I do have a few photos.

The pirate costume I wore in DW is not new, but getting to wear it inside a park is!  I don't know if I've posted it here before, though.  The jacket is loosely based on a German woodcut from around 1750.  I wasn't looking for total accuracy, just something lighter and easier to pack than a gown!  The main fabric is worsted wool, the facings and cuffs are linen.  The stomacher is boned, the buttons are metal with ships wheels, and the tie is a lucet cord.

Barbossa came over to greet me during the parade, and, of course, I rode Pirates of the Caribbean then waited to take a picture with Captain Jack Sparrow.

On the day we boarded the ship, I wore a late 1930s style gown which I had an original pattern for.  The fabric is linen dimity (from B&T).  There's a grosgrain ribbon bow and I happened to have a number of vintage buttons that were just perfect in my Grandmother's stash.
I'm not sure it was the best choice, considering how many times I was stopped to ask if I was a particular "character" on the ship (or other questions about the cruise itself).  At least they had the time period right, since the ship is Art Deco.

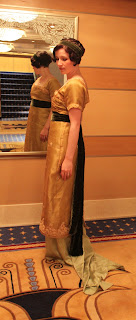
The last outfit was for the final night.  We had a reservation to eat in Remy's, which is a fancy Art Nouveau restaurant (there are five main courses, not counting things like amuse bouche and petit fours).  I'm also planning on making a 1912 gown in the near future.  So, I decided to quickly throw one together based on the pattern in Janet Arnold to wear on the cruise and to give me experience for the nicer one.  I used a vintage sari for the over pieces, silk chiffon between, silk charmeuse, and silk velvet. Unfortunately I had to dye the chiffon and charmeuse because they arrived in hideously bright shades of lime green (so not what the pictures looked like online).


Thursday, March 24, 2011

Jackets

I realized yesterday that there are many garments I've never posted.  Even some that I had shown or talked about progress with!  I'm still in the process of taking pictures of everything I've made, so here are a few different styles of jackets that I've created over the last three years:

Caraco Jacket, based on this original in the V&A.  The fabric is a cotton chintz from the Williamsburg collection that came out a few years ago.  My biggest issue was the unusual shape of this garment.  It was clearly made from either wide fabric, or was short enough to use it lengthwise.  Unfortunately not the case with mine, so there are some hidden seams in the back.  The fronts are fairly normal.  The bodice and skirt are one piece.  The facing is folded back and opens up below the waist.  The side seams have pleats inside of them as well.  There is a separate stomacher which is pinned on, then three sets of tabs extend across it.  I wove the kerchief between them.  The sleeve cuffs are pulled up by a cord over a button, with a small pleated trim.

The back is the unusual part.  I must admit I spent hours looking at the photos of the original, mapping out the chintz they used to see angles and possible seams.  The center back pleat is just like a Robe a l'Anglaise, but just one instead of the normal two.  What gets weird is that the sleeves are of the same piece as the back.  Why?  I have no clue, but it was a fun challenge to drape.  There's no center back seam, and a small tuck is taken at the waist to shape it.  I need to make a few alterations to the petticoat, it being too short and a little narrow for my taste.

Bedgown, patterned from Diderot.  I know there is a commercial pattern based on this, but I was curious to see what alterations had been made from the original.  If you've ever seen it, the most obvious thing is that mine is a great deal shorter.  The exterior is a worsted wool with a heavy linen lining.  I wish the sleeves were longer, but I was using leftovers and ran out of fabric for that.  The front ties with linen tape, and you would usually wear an apron over it.  It's really all one piece with the seams up the sides, very geometric design.
The back has a very deep box pleat that opens at the waist.  I'm still struggling on how to make the collar  part of the main garment and get it to lay correctly.  The longer you cut the collar in back, the further down you're cutting into the back neckline.  The modern patterns fix this with an added collar piece, but I wanted to see if I could follow the instructions exactly.  It works, but pulls a little funny.  Would probably fit a woman with 18th century posture better since their shoulders sit further back.


Fitted jacket, from the Snowshill collection in Janet Arnolds book.  I did make the cuffs a little smaller.  The front pieces have gores put in to allow for the hips.  I think mine needed to be a little larger and definitely taller.  The cuffs are simple pleated bands, whipped on.  The front pins closed.  It's just a light weight linen, meant to be a good summer weight.

The back has excess in the skirts at the seams, cut with extra "pie" wedges to create the fullness at the hem and not the waist.  I'm still struggling to keep them looking decent, but I think it's the fabric.


Short gown, which I don't really know provenance for.  I've made dozens like it for where I used to work, and it's one of their fairly recent designs (so it's well researched I'm sure).  It's very simple though, being a singular piece and unlined.  There are facings on the sleeves to allow them to fold back.  The center front laps over and pins shut.  Edges are simply rolled to be finished.  This is my lightest garment, made out of complete necessity for a Virginia summer.
The back has pleats sewn in similar to a Robe a l'Anglaise to fit the garment to the body.  There is a small piece used inside the back neckline to face it, rather than rolling the pleated edge.  By far one of the easiest things I've made.  I cut one out for my mother and handed her this as an example, which she completed easily in a weekend.  She's a beginner to historical costumes, only having made a petticoat and apron prior to it.


A quilted waistcoat isn't quite a jacket, I know.  I did a post on this a while back, but these are much better images.  Based on an original at the Atwater Kent Museum.  Sharon Ann Burnston wrote an article about it here.  Mine is a cotton chintz with linen lining, bamboo batting, and linen tape binding.

A very simple design, it could be worn around the house for lounging, or along with stays for warmth.  I sometimes wear it under a gown, occasionally over if the gown is not large enough to accommodate the added width.  It isn't meant to be worn on it's own however.  Namely, it's not a bodice!!  I wouldn't wear it as the image shows in public.


Monday, September 22, 2008

Bodice Assembly


When putting together a woman's jacket or a bodice for a gown, the assembly techniques are generally the same.  I've already shown in a previous post how to lay out the front pieces and stitch them together.  Leave the seam allowances at the ends un-sewen (shoulder seams, side seams) so you can fold it over later.
When stitching the back seam I generally use a back-stitch on the fashion fabric.  The lining can be done the same or with a butted edge.  For that you fold over the seam allowance on both sides, put wrong to wrong side and do a very tiny whip stitch.  Grab just a few rows of the weave each time.  Don't stitch too tightly, but do keep it snug.  When finished you pull the two sides apart a bit and the seam should be able to lay out flat (hence why not too tight of stitching).  This same technique can also be used on selvages and I've seen it on shirt seams like that.  If you're doing a jacket, you can put the fashion and lining backs together and stitch around the neck and bottom hem up to seam allowances.
The sides can also be done a few different ways.  I like the method I found in Costume Close-Up.  Fold over the front fashion fabric and line it up on the back pieces.  You will stitch a spaced back stitch very close to the edge through all three layers.  The front lining will then be folded towards the seam and stitched down, enclosing the raw edges.  You can also use the same technique explained for the back seam, but use the back stitch on the fashion fabric seam instead.
Sleeves use the same techniques as the side or back seams (underhand whip the hem) and I've seen the armscye left raw and whipped, with all allowances sandwiched in the sleeve, and where it's inside the bodice.  It's all up to you and whether your fabric frays and if you want to see stitches externally (and where).

Exterior of a side seam for a 1790s jacket I'm building.  Shows the spaced back stitch on the side seam (horizontal in picture) and the underhand on the bottom hem.

Repeat imagery of the ever so useful backstitch I keep mentioning.
The overhand stitch.  Same usage as underhand, but shows up as a small dot on both sides.  Just up and down with the needle very close together.
Similar to over hand, but as a seam.  Resembles the spaced back stitch in form and function (just doesn't back up on the small visible stitch).  Use for side seams or armscyes.
The butted and whipped seam.  Not the prettiest of examples, but it would be the lining anyway. (Also used to piece together stays, but I'll be doing a workshop on those in November).

Just like modern stitching you need to find a technique that works for you.  Every extant garment is different and there are probably many stitches we haven't ever seen!

My caraco is nearly completed (one more cuff, then some details).  I'm hoping to do a pair of mitts soon, a 1780s gown workshop, a stays workshop, and eventually a riding habit workshop in January.  I move in two weeks, so if I disappear for a while I promise I'll be back!