Tuesday, March 22, 2011

Regency Inside-Out

This is by far the simplest garment I think I've ever made.  It has no lining, drawstrings and gathering to adjust fit, and mostly geometrical shapes.  The gown was draped in a B&T workshop, but I've adjusted the pattern for my second muslin gown and will probably do the same for the taffeta.  It's all made from a brown cotton muslin with a small stripe running through it.

The fronts run straight over the shoulders, extending to the back similar to 18th century gowns.  The center front piece is just a long rectangle gathered to the underbust band on bottom and drawstringed on top.  Getting the band measurement correct is really the most specific part of the whole gown.  The front area of the skirt is left flat, some gowns don't start pleats until the half-way point.

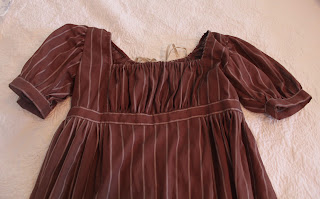
Sleeves do have a fair amount of head on them (curve on top), but being gathered in at top and bottom it's more for volume than allowing for movement.  The cuff here is fitted snugly to the arm to keep the "poof" up.  You can choose to drawstring the hem instead.

The back I fastened with hooks and eyes, using the drawstring which starts in the front pieces to tie the very top off.  You can see where the front pieces attach, not terribly far back.  Again, personal choice.  My next gown has a much more severe diamond shape to the back pieces.

I used the underbust band to finish off the edges inside.  The seams I felled, but since the fabric wasn't prone to fraying I left the armscye and the skirt seams raw.  Small eyelets in the front rolled edge and on the left back neck allow the linen tape to exit the channel unnoticed.

There's no easy way to photograph it, but you can see at least one skirt seam here.  The skirt is made of four pieces.  The front angles out toward the hem, the two side pieces have one straight edge at the front and a more severely sloped back edge, the back piece is rectangular with an opening slit cut in the center back.  It's just one way to do it, you can use as few or as many as you would like in reality.  The top needs to be smaller than the hem unless you want to look extra poofy and there needs to be some angling out at the hips (or pleating over the sides).  I don't recall measures of this gown skirt or the other muslin, but I'll be sure to keep track on the taffeta.  Some of it depends on the fabric width.

I threw together a pair of long sleeves the morning of the event.  I simply measured the sleeve band and my wrist for width (loosely at the wrist so the hand can fit through).  It flares out 1" after the wrist to fit long over the hand.  Very simple shape with only one seam which quickly whips to the permanent sleeve bands.  Making it on the diagonal allowed for a tighter wrist fit.

Monday, March 21, 2011

Military Through the Ages

This weekend my housemate and I decided to get out of the house and go to Jamestown's Military Through the Ages.  And two costumers can't just go to a historical event, they have to dress!  It is a very interesting event though, traversing dates from Charlemagne and Vikings up to WWII and modern military.  Wonderfully anachronistic.  I know there are events similar to this all over the country, and I really do recommend them, especially if you're considering a new time period or living in a new area.  My housemate, Gwendolyn, is fairly new here and had a great opportunity to chat with the local Civil War re-enactors about upcoming events and groups to join.  After seeing some of her lovely 1860s gowns I'm quite inspired to make some of my own.  But, that is to come later.
We decided to go in 1812 attire because there aren't enough excuses to wear it around here, and it's so terribly comfortable.  So, here is a simple shot of a gown I'm going to do an inside-out on in the near future.  It's just a simple un-lined brown muslin that came from a Burnley & Trowbridge workshop.  Shift, corded corset, and underpetticoat worn underneath.  The bonnet is actually a modern hat that was hanging out in the closet never being worn, a little ribbon and tacking up the back and it has a life again!  Gwendolyn made her ensemble, a lovely dotted swiss gown and silk velvet spencer.  And she made the bonnet from straw braid, giving me another great inspiration to attempt!  I also really need to make a chemisette....

Sunday, March 20, 2011

Inspiration Sources

I had an amazing week listening to people discuss their research and processes at the Accessories Symposium, which has quite inspired me to follow my process much more closely.  I recently finished a muslin 1812 gown and I'm just about to start on a silk taffeta one as well.  Their design came from two different sources, so I'm going to try to do a quick run-down of the muslin gown (and the problems I encountered!) and really follow all the steps of the taffeta.
To start with I wanted to talk about where to get ideas from.  I use a huge assortment of resources, some more reliable than others.  Generally their broken down between Primary and Secondary, but even Primaries have their issues.  Most of my clothing items begin with fabric, which is a whole different post, and then I begin to look at what I can do with it.

Primary
Extant Garments:
There really isn't a better source, but hands-on just isn't an option for most of us.  Museums have extensive galleries online, providing a visual for fabric weight and texture, as do antique sellers.  Most don't get detailed enough to see construction techniques unfortunately.  As discussed this week, the garments are almost always shown alone, without context to the whole outfit, fit, who wore it when or why.  Try using different terms when searching, ex. some museums use the term "dress" rather than "gown".  Demode Couture has an amazing list of museums sources.  I generally start out with these five:
The Metropolitan Museum
Museum of Fine Arts in Boston
LACMA
Victoria & Albert Museum
Vintage Textiles

Fashion Plates:
Or magazines and catalogues in the later time periods.  Just keep in mind it is high fashion and an artists rendition.  And they never turn around!
Maciet's Prints (through Lisotchka's LJ for instructions)
Ackermann's Repository of Arts

Written Word:
This could be novels, letters, informational books, advertisements, runaway ads, etc.  The difficulty here is often the limited info provided and deciphering the terms used.  Especially in the case of fabric terms.  I often use it to understand what sort of garments a more average person owned, such as the propensity towards gowns instead of jackets in the 18th century no matter what the class.  Check out your local area to see if they have newspapers available online if you re-enact a specific region.  In my historic area the VA Gazette is available and easily searched.  If you have an ebook reader, take a look at just how many novels can be found for free.  This is an area I'm just beginning to delve into, so hopefully I'll be able to come across some more specific examples in the future.

Artworks:
Anything from a formal portrait to sketches of the street.  Formal portraits tend to provide the best detail, but judging their usefulness in accuracy is difficult.  The sitters often wore their best clothes, or possibly even a costume.  The artist also interprets and possibly adjusts the image as well.  Informal sketches are a rare source for what people have worn day to day, but even those have their faults.  If the artist really wanted to portray the person as poor, they may have included a few "hints" of what always triggers that assumption (today we think of patches as an ex.).  Caricatures and satire do well if you can isolate what the artist is making fun of and keep that out, such as the tall hair of the 1770s.

Secondary
Modern Books:
Despite the fact that books like Janet Arnold's and Nancy Bradfield's provide so much more detail and information than most primary sources, it's still their interpretation and something is going to be left out.  But I can't imagine trying to do historical fashion without them.  On my main bookshelf (there are dozens not listed, or just on my wish list):
Patterns of Fashion; Arnold, Janet
Regency Era Fashion Plates 1800-1819; Timely Tresses
Costume Close-up; Baumgarten, Linda
Historical Fashion in Detail; V&A
Underwear Fashion in Deatil; V&A
The Dress of the People; Styles, John
Fashion; Kyoto
Costume in Detail; Bradfield, Nancy
Corsets & Crinolines; Waugh, Norah
The Cut of Women's Clothes; Waugh, Norah

Media:
Films and television.  No matter how high I put the goal of accuracy, I'll still have Pride & Prejudice playing in the background.  I'm not going to copy anything from them, but it is an inspiration and can give a beginner a sense of the time.  Even if you find a piece in a movie you absolutely love, simply use it as a challenge to find a primary source to support it!

Other costumers:
We all do it, ogle the latest gorgeous frock from a blog, LJ, or even in person at an event.  Once again, it's a spring board.  Despite the fact that I could well support anything I wear in a discussion, I still don't think I'm at the point where I should be "copied".  Every time it goes down the line, it ends up like telephone.  I will try to provide sources for most of what I do, but sadly that is not the case with everyone.  If you see something you love or don't understand, ask about it!  Hopefully the owner will be able to give you some great new resources and ideas.

And just so this isn't all words, here's a small preview of the muslin gown up next.  I challenge you to find the extant garment it's based on. *Hint: this is the shoulder.

Thursday, March 10, 2011

Revamping a Pair of Shoes

What to do with an old pair of black leather 18th century style shoes?  The leather is beaten, worn, wrinkled, and as I now know, of very poor quality historically.  That relegates them to being rough shoes to wear in the mud and dirt.  Only problem is, the sole is so thin I'd feel every bump!  More like dance pumps than anything.  Solution?  Pull out some fabric, ribbon, and hot melt glue!

First step was to choose fabric.  I had a scrap left over from my white stays, a rather heavy herringbone weave of linen and silk.  I pulled some matching white silk grosgrain ribbon and light-weight white leather (for the heel).
I trimmed the tongue and straps to points for some variety.  I didn't want to work around a curve on the straps and you so rarely see pointed tongues now, despite such popularity in the 1780s.
You can see just how beat up these poor shoes are!

Next I clipped the stitching that held the quarters and vamp together.  It will make it easier to lay the fabric on the vamp, then stitch it all closed in the end.

I pinned the fabric to the vamp first.  It's a rough cut, but I'll trim the excess off before attaching it.  I leave a scant 1/4" around the sole to be turned under and glued.  The rest will be trimmed off when I bind.  The key to this fabric was getting the lines fairly straight with the shoe.

I used hot melt glue to fix the folded edges down, poking them as far in the crack between the sole and upper as possible.  This is where a darker or more solid fabric would have done better, since you can just see the color difference around the edge.  But, it's what I had and it does then go with all of my formals!

You can see the edges better here.  Not too bad for the easy way out!

I then pinned on two rough pieces for the quarters.  I cut the edges at center back, not folding them or attaching together as you'll see why later.  I did put a small line of glue under each side though.  Glue down the bottom edge just the same as the vamp.

Next comes the part that really makes it looked professional: binding.  I folded the edges under at the base of the vamp tongue rather than bind and end up with more bulk.  The quarters get stitched back on to that section so it isn't visible.  The rest is trimmed down to the edge or just past.  If you leave any allowance the binding is more likely to push back at it and bubble unless you use dozens of pins.  I just used a running stitch to attach the ribbon (small dot on the outside, longer on inside).
Before binding the quarters I placed a small strip of ribbon down the center back to finish the seams.  Since there is so many extra re-enforcement layers in the heel I just stitched to the fabric and not through the leather (reason for small strip of glue).  The bottom edge is folded under, the top left raw to be bound over.

Once the binding was done around the quarters, I stitched them back down to the vamp at the sides.  The heel I covered using white leather (pliver) and rubber cement.  I used a small flathead screwdriver to push the top cut edge into the small separation.   I had to put new sole leather on the heels anyway, so I just removed the old and pasted the leather down around the edge.  I'm not sure if I'll use these buckles, but they were with the shoes.
No where near as pretty as a properly made pair, but they'll do for the next few months until I finish my first official pair.  As long as the sole doesn't wear through that is!

Wednesday, March 9, 2011

Parasol

Parasols seem to be quite fashionable and diverse in the late 18th century.  I found images of tiny ones and "market umbrella" sized ones as well!  Check out The 18th Century Notebook for a great list of images.  So, I went onto eBay and started searching for antique parasols to see if anything fit the bill.  First rule was a wooden handle.  No plastic, bakelite, or bone (starts to crack if not cared for); tortoise or horn might be acceptable.  I was hoping for either a very simple ball end or a handle at a right angle.  I didn't expect to find baleen for spokes (metal started in the 1850s), but they needed to be functional and in tact.  The fabric was unimportant since I was going to recover it, preferably there'd be at least one panel together to use for measure.  And I wanted a medium size, about like a regular umbrella today.
What I found was that parasols sell for a wide variety of prices.  It all seemed to be centered on how pretty and in tact the fabric was though!  So, I found a plain black umbrella, late 19th century (the mechanisms say 1888 on them, but I don't know if it's a year or model number).  The wood stick and handle were painted black, there was a bit of carving, but nothing exciting.  The fabric was also plain black, minimal damage, with only a small fagoted seam for decoration.  Boring.  And therefore cheap!
I started pulling it apart before taking any pictures (oops!).
This parasol had obviously been well used and loved.  The tip was worn down and the areas inside fabric were storing a lot of sand and dirt.
They had added gathered pieces to hide the mechanisms, I wasn't really sure if I wanted to do that as well.
There were also small circles of fabric over each joint, probably to keep those from wearing at the main fabric.
I pulled out one panel (didn't take long since the stitching was rotting).  I added a bit of extra seam allowance to be trimmed away later.  I used a blue/yellow changeable silk taffeta.
Once the canopy was stitched together and seams were finished I went to work on the small pieces.  I added the small circles to the joints, then a pinked circle at the very top inside.
The original had a metal ring which had a long cord and tassel attached to it.  I couldn't find any examples where they used a closure, except for a small tab on a MFA extant (but no good closeups), so I didn't replace the cord.  I kept the ring on since it fits over the ends and keeps them closed, but doesn't get in the way.
I didn't have the sizing perfect on the canopy, so there is a little bit of wrinkling at the top.  I covered that and made a nice finished opening with a flat, pinked piece of fabric.  There are a few paintings that seem to show a top piece like that.
I also sanded and stained the wood.  The black paint was worn and chipping off, not to mention not very pretty.  I sanded it as well as I could, then used an ebony stain and oil finish.  The carving stands out a lot more now and the wood grain has a nice antique look.
You can see the small piece inside the top to hide the mechanism.  It also allowed me to stitch the canopy to it and keep it from pulling off the top.  I pinked two circles, folded them in half, then slit an opening in the middle.  Placed around the stick and stitched to two halves together.
Hopefully I'll get some better pictures out and around town soon!

Wednesday, March 2, 2011

In Between

I'm still around this week, I just don't have any recent projects finished to post about and the other topics I don't have time for at the moment.  The Accessories Symposium begins in just over a week, which I will take off from on Friday evening to drive up to Belair Mansion for the weekend and teach some rough militia men about fashion (or something like that).  Needless to say, there's a lot to be done, and there will be an equal amount to be posted after that week!  Hopefully I'll finish up a few key things this weekend and do a quick post next week of some value.  In the mean time, here are the three major projects I've got going (soon to be supplemented by a friend's linen gown and some sort of a bag).

Embroidered Mitts.  I have linen and wool galore, but no fancy ones.  A problem if I want to wear my Polonaise out and about.  The outside is silk twill with leather linings and taffeta facings.  I've got a lot of embroidery to do though!  They'll be copied from the pair in CW Collections.

My husband's suit.  I've got the breeches ready to fit again, if only he was ever home!  I'm hoping to have the waistcoat and coat in progress for Belair as examples of what goes on inside.  The coat and breeches will be a lovely burgundy color while the waistcoat is of gold persian silk twill (fidgety little thing).

Silk parasol.  I ripped apart a late 19th century parasol I got on ebay for very cheap (the fabric was a very boring and undecorated black).  I've got the taffeta stitched together, I just need to spend some time re-staining a few spots on the wood and cleaning up the mechanisms.

Wednesday, February 23, 2011

Un Grand Chapeau

With the Accessories Conference looming a short distance away, I keep reading blogs from ladies who are building quite a trousseau to bring with them!  Unfortunately I don't have the time to build a new gown, nor do I really need to with the number of things I have.  So, what better way to prepare for that conference than to build a bunch of accessories?  The Robe a la Polonaise I recently finished seems to show just about anything you can imagine with it in its fashion plates, so that seems like the best outfit to revolve around.  My new Brunswick jacket already has a fur muff and there's not much to do other than that.  I don't know how many items I'll finish by March 12th, but I will certainly keep posting them here as I go along.  First on the list is a GIANT fluffy hat.

I wanted something akin to these.  I have plenty of taffeta, silk gauze, ostrich feathers, and even paper flowers.

Making an aqua and yellow hat seemed way too matchy-matchy, so I started with just the yellow silk from the trim.  I decided to do a pouf in the middle, silk covered in gauze.  The gauze strips will gather around the edge and the silk donut will cover their inside edge.

I first gathered and stitched down the ruffle.  I'm trying to hold the back up with a few tacks so it can bend overnight.

Next I stitched down the silk donut.  You can see how the backside is already prone to curve a bit.  I used a spaced back-stitch, but kind of wish I had slip-stitched it instead, even if that would be more difficult.  I also ironed the gauze down a bit.

Then gauzy pouf!  I left the gauze 2" larger around than the silk for a second ruffle and gathered both pieces together.

 I found another taffeta in my stash that was a slightly pinker yellow, bordering on rose.  I took a 10" strip and ironed the edges over.  I did quick pleats at the flowers and the back to gather it down.

 The rest of the silk length I played around with for a bit, trying bows and fans, but finally settling on pulling it over the edge into the crown.

Next I played around with the flowers a bit more, tacking them down, and organized the feathers.  I have so many colors of each that it really was a bit of a challenge as to what to use.  In the first picture you can see the Polonaise it's meant to go with.  In the second, I've curved the feathers a bit more so they don't stick up so high and tacked the brim to the crown in back so it stays curved up.

Quick mirror pictures.  I need a bigger wig, mostly in width.  Certainly seems like an appropriate Spring outfit though!  I also need to tack the flowers and feathers more, especially in case of a windy day.

Today I'm working on recovering an antique parasol, if only I could get the MFA website to co-operate!!

Monday, February 21, 2011

Worsted Stays

My first pair of stays were beginning to show some major signs of wear, but I work too often to do any repairs to them.  Solution?  Make a second pair!  I decided to make this pair out of a lovely teal worsted wool, not only to show off all that channel stitching but to co-ordinate with the Robe a la Polonaise I was currently making.  They're still based on the same original stays that my white pair is.  The fit was just so comfortable I couldn't argue against using it again!


As always, I hand-stitch EVERYTHING.  I used a heavy, bleached linen thread for all of it.  Channels are all back-stitched except for the ones next to the center back which have a spaced back-stitch.  I usually end up with around 10 stitches per inch, a little on the tiny side.  Seams are butted and whipped together.  The center front is "open" part way down, but the laces keep it shut.  The eyelets are created using an awl, finished with double thread (the only other place double is used is on the seams).

The un-lined inside looks a bit rough.  You can see the heavy linen used for the structure and boning channels; two layers covered with the wool on the exterior.  The seams are whipped down before lining. The leather binding is stitched with running or back-stitches to the outside then flipped in and whipped down.  The heavy linen is cut to the finished edge, but the wool is left about 1/2 longer and whipped down before binding.  It helps to stitch the leather to an edge which isn't fraying.  You can also see the connecting thread between the eyelets, which will get hidden by the lining.

The linings purpose is to take all of the sweat, friction, and smell of the body.  It's easy to remove and has as few seams as possible (none in my case!).  The tabs are done separately, which I can vouch is much easier than trying to work around those curves with one piece.  It also means that you may not have to replace tab linings each time.

Notice how the leather binding curves over the ends just slightly.  Adds more durability to that corner so no fraying edges sneak out.  I'm thinking about adding leather strips around the eyelet holes as well to keep the lacing from wearing them down.