Tuesday, February 15, 2011

Polonaise History

This is going to be a very brief idea of what a Robe a la Polonaise is.  There's not a mass amount of reference material easily found on this type of gown and I'm certainly not going to make anything up.  However, and this is the fun part, Brooke Welborne and Kendra Van Cleave have done a lot of research on it for the last few years and should be coming out with a very in-depth article soon (squee!).

So, what I want to do here is show some fashion plates, and a couple extants, and talk about the many options you can see here.  As I mentioned previously, this gown was very popular in the 1770s and 80s. It can be full length, short jacket, or in-between.  Even though the gowns were polonaised in back, the short jackets weren't.  But, the separate and loose front still defined them both.

This is a solid silk taffeta robe trimmed with silk gauze.  As you'll see in many of the fashion plates, gauze is VERY popular.  The trimming continues all around the hem of the gown, with a deep ruffle on the petticoat.  Notice the placements of the bows is very far down compared to some of the following images.

Stripes were certainly common as well.  Notice how her polonaising is very uneven, with the fronts being much higher than the back.  She still uses gauze trim, which one the sleeves continues all the way up to the armscye!

This is one of the publicly findable extants, from the Met Museum.  It's just about the reverse of my color scheme.  The trimming is very simple, just applied.  The neckline has a collar instead of a typical open gown neck.  Most of the seams have cording sewn on.  The trimming on the long sleeves is at the top rather than elbow or bottom, it seems to be a hap-hazard puckering.  I'm assuming they have the skirt pulled up completely, and it seems to be fairly low compared to some other images.  I do love the applied "bows" at the ends of the seams.

There appears to be a tie in front, possibly to hold it together.  They've pinned the front closed further down, which gives it a very awkward puckering.  I'm assuming the bodice is missing on this extant.  It does clearly show the obvious widening of the trim as it continues down.  The full length sleeves are often found in the 1780s, rather than early on.

This fashion plate also has the cording along the seam lines, although her gown is again trimmed in gauze.  Yet another trimming option of flouncing on the petticoat.  The skirt in this case is pulled up by use of ribbon or cording, just barely visible.  Her sleeves also appear to have the random puckering.  And one must apparently have an equally grand wig to go with their gown, as all of the fashion plates show!

This is a perfect example of a short jacket.  Long sleeves were common on this style, which was more popular in the 1780s.  It also shows off a fabric option of "toile", what looks to be a cotton print at that.  The border trim would also be a really interesting challenge if you aren't the ruffly type.

The overall design isn't much different from the prints before.  The petticoat has a very deep flounce and the gauze trim on her gown appears to be stuffed.  She also has a few tassels hanging in front and back.

This is one of my favorite examples.  It's in the Colonial Williamsburg Collection.  They made a recent study of it, reproducing it three times over; once as a copy with all the defects, again by hand but adjusted to a pattern, and finally in a different size to be used by an interpreter.  It's an unusual piece with some strange stitching, but it goes to show there's no singular right way.  It's shorter than most of the gowns in the prints, the skirt is pulled up with a strip of fabric which hooks to the back.  The cuffs are made separately with very erratic tacking then stitched onto the sleeve.  There are also ties in front, but the bodice is missing and appears to have been a separate piece.

This is my favorite print for some reason.  It's a very simply trimmed jacket and the only time I've seen a contrasting petticoat.  All of the seams appear to be corded.  Make this out of a cotton dimity or cherry-derry and this would be an immensely practical summer garment.

This example is a bit unusual.  It appears to have no trim, but if you look very closely and read the description, there is a border on the petticoat and possibly on the gown of a different colored taffeta.  The back also appears to be separate from the skirt and there is an immense amount of fabric pulled up!  I can't tell if the neck ruffles are built in, but I don't see evidence of a kerchief.

This is the image I used for my trimming.  She also appears to have a ruffle around the bottom of her bodice, but I left that off.  You can clearly see a narrow gauze ruffle around the neckline on her gown as well.

She has a very interesting, almost wavy edged trim around her gown.  And the flounce is topped with an erratic puckering.  There is also a small line of trimming around a pocket slit.  I don't have a slit in mine, and the images often don't show one, but it is apparently an option.  She also appears to be wearing a bum roll rather than side hoops.

This again show the uneven polonaising, as well as a plethora of bows.

This print labels her fabric as l'Indienne, another type of cotton chintz, again with gauze trim.  The line of gathering on the trim is far off center, comparison to most of the others which use one or two lines equally spaced.  Her bodice also appears more waistcoat-like, though it doesn't distinctly show buttons.


This gown appears to made of a similar toile to the orange jacket above.  It shows just about every matching accessory one could imagine, sans a walking stick or puppy, but she is out of hands.  Perhaps a few ideas to attempt accomplishment before the upcoming Accessories Symposium in March?
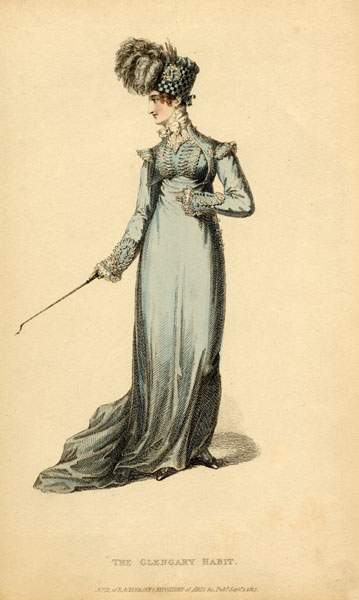
And finally "The Spruce Sportsman, or Beauty the Best Shot".  This lovely jacket is not only shown with a contrasting petticoat, but a different color bodice as well.  The Margaret Hunter Millinery Shop at Colonial Williamsburg recently did a living version of this work.  You can find the making of it on their Facebook page.

Sunday, February 6, 2011

Shoes

This weekend I spent a couple days in the second part of a four part workshop on making 18th century ladies shoes.  It is extremely in depth, taught by one of the shoemakers from Colonial Williamsburg, Brett Walker.  I want to try to talk about the general history and construction of shoes from that period.  It's a huge subject to try and sum up in one post, but I can honestly say I'm not well versed enough in shoes to make a long stretch of posts (but I hope to be!).  What I'm going to try to do here is get rid of a few "myths" and give you a better knowledge in purchasing or making your own shoes (including a few recommended shoemakers).  As a topic rarely touched upon, please let me know if you have questions or if you would like anything explained in a more in depth manner.

First, the anatomy of a shoe.  I highly recommend getting to know these terms, not only will it help you in recognizing the time period of a shoe, but you can use them if you order anything custom so you'll get exactly what you're looking for.

The Vamp is the frontal part of the shoes which covers the toe area.
The Quarters cover from the back and can continue up and over, extending into straps for the buckle.
The Tongue is an extension of the Vamp which continues up above the buckle.
The Heel is a wooden piece that lifts the back of the shoe.

The Toe is the tip of the last or shoe.
The Joint is measured behind the toes, the "ball" of the foot.
The Instep is the top of the foot where the bone drops down.
The Heel is the very back of the foot/last.


A wooden Last is what a shoe is built over.
The Upper refers to the Quarter and Vamp (fabric portion).
The Sole is the bottom piece of leather which wears against the ground.
The Insole is inside of the shoe on the bottom, between sole and foot.
A shoes Lining can be made of leather or linen.
The Binding that covers the raw edges of the shoe can be linen, leather, or silk.
Toe-spring refers to how closely the toe of the shoe sits to the ground or bends upward.
A Rand is a small, folded piece of white leather that is inserted between the Sole and Upper.
A Randed shoe has a Rand and is made right-side out on a Last.
A Turned shoe is made inside-out on the Last, then turned.  It has no Rand.


Next I have a variety of shoe images from across the 18th century.  All of these are taken from the Shoe Icon website.


The first shoe is from 1720-40.  Notice the large floral design on the fabric, this is only popular during the first half of the century.  The toe is very pointed and has a fair amount of toe spring.  The heel is large, almost clunky.  The quarters are short, only about half of the overall length and the tongue is very long, extending about an inch above the straps.  I will note here that despite being a large tongue, it is not "gathered" up into a fan shape.  Where that idea came from I have no idea, but to my knowledge (and that of far more reliable sources) they didn't exist in the 18th century.  And last, but not least, the white rand above the sole.
This shoe is dated 1750-1760.  It has a very different look than the first.  The heel is still fairly large, but no where near a clunky heel.  The fabric is plain weave corded silk, although floral brocades were still popular at this time.  The toe is round and has very little spring.  The quarters have begun to lengthen as well, but the tongue still shows far above.  Rands have fallen out of style at this point as well.

The third shoe is from 1775-85.  The heel has narrowed considerably into an Italian heel.  The toe has brought back some of the point, but no spring.  Brocades are out, replaced by solids, small stripes, or very petite designs.  The tongue is shorter and becomes pointed for this small window of time.  The use of Whit-taw (white tawed leather) on the buckle straps seems to be limited to this time as well.  The quarters have lengthened to about 2/3 of the total.

This shoe is 1790-1805.  The toe is very pointed and the heel very short, but still tiny.  Buckle straps have disappeared and gone out of style, leaving the instep uncovered.  Decorating with small bows or trim seem a popular way to replace the buckle.
This pair is also from 1790-1805, but seems to exhibit what is to come in the next century far better than the last pair.  The heel has disappeared almost completely, if one can call a slightly thicker leather at the back a "heel".  The point occasionally has some toe spring, but not always.  The cut-work and tambouring on the toe are is a very popular decoration during this time as well.


Now that we know the basics of what a shoe looks like, what is it made of?  And what variations existed?

If you ever visit a re-enactment or costumed museum site *ahem*, it seems to be that 90% of all ladies wear black leather shoes with little or no heel.  The only ones who don't have on fancy silk gowns.  It isn't truly the case.  Did black leather shoes exist?  Yes.  But who wore them?  Garsault specifically says that leather shoes are for the "low, mean sort".  Records show them being given to the poor by the church.  I will follow this up by saying that the European continent (especially farther East) tended to have antiquated and simple tastes with shoes.  This example may have come from that area where plain leather shoes were a bit more common.  Just step out of modern ideas and think about it, leather may be durable but it was cheap at that point (not an upgrade like today).  Black may "go with everything" today, but it would be awfully boring to only own black shoes EVER.  Women way out in the wilderness were ordering fabric shoes rather than leather, and a quick perusal of the VA Gazette shows more listings for Calimanco, Satin, and Silk than leather!

You will see black shoes in a great deal of art from the 18th century.  Whether this was just a simple way to draw/paint them or they truly all wore black shoes is hard to say.  In the Gazette listings of coloured Satins and Silks were often mentioned and I saw one specific mention of Black Calimanco.  I did see one Black Leather listing, but it was in the children/youth shoe mentions, not womens.  Sturdy silks and wools were much more elegant and could still stand up to a lot of wear.

Not all leather shoes were of poor quality.  Nicer, colorful leathers were available and a bit stylish.  What you have to remember is unlike today, leather was not "better".  Leather car seats or sofas are an upgrade now.  Not back then.  Leather was cheap and easily available.  Yes, it is durable, but do we all wear work-boots all the time just because they wouldn't wear out??  Fashion was important, even for the ladies who were far out in the wilderness.

Brocades and Damasks were a popular, fairly durable, option for shoes up until about the 1770s.  Designs weren't always huge and colorful.  The narrow stripes on this shoe are a bit deceptive, hinting at popular styles to come in the late 1770s, while the overall silhouette shows this shoe to be from 1750-70.

This shoe is made from a lovely silk satin and unusually trimmed with fringe and a large rosette instead of a buckle.  This pair is dated to 1780.  The small heel, pointed toe, and pointed tongue date it even without some of the more obvious signs.


Also in a silk satin, this pair uses a single, trimmed bow to replace a buckle and straps.  The heel is a bit larger, but it still dates to the 1780s.  Some ladies were, perhaps, a bit more practical or less sturdy on their feet.


This is a ladies slipper.  It was meant to be worn about the house, although you do see some images of laundresses wearing them for working.  It's made on the same last as a normal shoe.

 Not all shoes made were "wearable".  Just like some of the extreme shoes of today, they too had their experiments.  One doesn't have to wonder how this pair survived the years.  I'd be surprised if it was ever worn!

Overshoes were a very practical way to keep your soles and heels from wearing out and protecting the fabric uppers from rain or dirt.  This pair is open, but some did cover the toe area of the shoe.  They were built to fit a sister shoe exactly, the ridge in the middle is filled with cork.

Overshoes didn't have to cover all of the shoe either.  This pair, from the 1790s, covers only the toe area.  It attached using a small strap that went around the heel.  Being of leather it probably did more to protect the fabric or toe tip than the sole.


Monday, January 31, 2011

Robe a la Polonaise

Up this week is my new Robe a la Polonaise.  It was started in *surprise* another workshop through Burnley & Trowbridge.  This time the lovely Brooke Welborn taught the class during one of her trips back from Cairo; she has made an intense study of Polonaise gowns, beginning with her final project of apprenticeship at Colonial Williamsburg.  I'll try to talk more about the history of the Polonaise gown in my next post, but a quick description; it was a popular style in the 1770s and 80s defined by the separate outer front which drapes away from the body.  It can be a short jacket with no polonaising down to a longer gown (such as mine).
I chose an aqua silk taffeta for the main portion (petticoat and gown always match) and a yellow taffeta for the trim.  Silk gauze for the sleeve ruffles and kerchief.  Mine is worn over side-hoops.  The fitted front bodice is pinned closed.  All of the trimming is roll-hemmed at about 1/8", gathered with a whip stitch, and stitched down.
You can see how the outside fronts fall back, folding up a little over the hips.  The bow is separate and pinned on.

The back shows the satin ribbons which hook up in back to gather up the skirt.  You can also see two pleats taken in the front piece that are stitched down to the waist.  The gown hem just barely passes the trim on the petticoat, which was intentionally done.

Laid out the gradual widening of the trim becomes more obvious.  There are three thread loops along the side back seams of the skirt to help guide the gathers up the ribbon.  The hem is rolled at about 1/4" all the way around to the neckline.

Here you can see how the outside front is only attached at the neckline, armscye, and side-back seam.  The pleats are not stitched to the fitted bodice.

I chose to insert the top of the sleeves between lining and fashion fabric.  The shoulder area is stitched folded over on the sleeve with a spaced backstitch.  About half-way down the sleeve becomes exposed and all is stitched with a regular backstitch.  This happens at the shoulder seam in back and where a seam *might* be on the front shoulder area depending on the fit.

The back is a very simple two pieces.  The side-back seam is not done how it usually is on gowns, but with a turned, non-visible backstitched seam.  The two pleats on the front are done with visible spaced back-stitching however.

I put a great deal of fullness into my skirt since I had wide fabric and wanted to!  There are two pleats under the turn back on each side of the side-back seam (2" deep) and one under the center back (1.5" deep).  The seams which run down the skirt are finished with a mantua-makers stitch.  Hooks on the ribbons and thread eyes on the bows allow the polonaising to be released.

The petticoat is bound with linen tape and has about 3/8" hem.  The ruffle reaches just below the regular hem.  *Don't make the ruffle extend far below, it may seem like it saves fabric but you'll end up destroying the ruffle quickly with shoe buckles, mud, rocks, etc.  Patching or darning a small area under the ruffle will never be seen, but you don't want to damage the ruffle itself if possible.

I know this is a garment which exists mostly in fashion plates, so if there's anything you would like more pictures of or clarification on, just ask!

You can also find a post on the co-ordinating pair of stays here.

Wednesday, January 19, 2011

Brunswick Jacket 2

Brunswicks are considered to be a travel garment of sorts.  Something fashionable, but practical.  Much like Riding Habits can be worn.  It's much easier to fit in a carriage, go visiting, or shopping in something not full length.  The Brunswick jackets also come with the added benefit of a hood.  It can be a very warm outfit when traveling in a cold coach for a few hours.  It is more of an upper class garment, not surprisingly.

Fabric
Silk is the most common in surviving garments, but that doesn't mean it was the only choice (it just means they were more "valued" and saved).  Many portraits look like taffeta, two extants are made from quilted satin (one, two), another is a watered silk, and I used a corded silk.


There is one portrait of a printed cotton and Barbara Johsons book of swatches shows a manchester cotton (small check).  The Colonial Williamsburg Milliners used a similar pattern in silk, which the amazing Susan Parris used as inspiration for one of her dolls.


While other fabrics, like wool, don't have any references it doesn't mean they didn't exist.  If you want a comfortable, easy, and warm fabric wool would qualify well.

Waistcoat
It can be low or high neckline.

You can also decide how the jacket will attach to the waistcoat itself.  I chose to make a separate waistcoat which the hood was attached to.  The jacket simply pins to the front when wearing.  Another option is to make the waistcoat fronts and have them attach at the shoulder and side seams.  A final option is to make false fronts where the fashion fabric attaches to the jacket front seam.  The lining encompasses both pieces.  In the last two cases the jacket back is higher on the neck to meet the waistcoat neckline.

Sleeves
Cuff or Flounce.  You can see both in the images above.  I chose a cuff because my fabric had too much body for a flounce.
The bottom part of the sleeve is a very simple trapezoid that whips into the main sleeve.  The seam is left open at the wrist for a few inches so it can be more fitted.

Hood
It's no different than a cloak hood in patterning.  You can gather or pleat up the back (even put a bow on it, as Janea showed us).  It pleats into the neck line.

Lining
I lined the main body with linen to just below the waist, as well as the sleeves.  The lower sleeves and hood I did in a taffeta.  You can also line the skirt with a fashion fabric.

Trim
Usually out of the same fabric, pleated or gathered.  Although, I have seen a few portraits with contrast fabric or gauze.


They are all fairly heavily trimmed.  Around the hood, down the front, around the hem, on cuffs or flounces, sleeve hem, and up the center of the waistcoat.  You also see bows on the cuffs/flounces and center front on the low necklines.

There are many other details that you can find in examples/portraits which makes this garment so unusual and customized.  The hem can dip in back or run straight, corner or curve in front.  Wear it with a habit shirt, kerchief, or ruffles.  The hair tends to be done up in a very fashionable manor, occasionally with a cap or bow.  Granted, these are formal portraits and sitting with a fancy hairstyle is easier than traveling with it.  There's even a slight variation to the Brunswick with a full length skirt called a Jesuit.

Sunday, January 9, 2011

Brunswick Jacket

The first inside and out of the year, my Brunswick jacket.  This was started, not surprisingly, in another Burnley and Trowbridge workshop.  I'll try to do the next post on the history and variants of this garment (there are a lot!).  What defines a Brunswick is a sacque back jacket with a waistcoat-like front, hood, and removable long sleeves.  Now, the waistcoat varies in appearance, as do the trimmings, cuffs, etc.  But, we'll get into all that in the next post.
I chose to make my ensemble out of a gorgeous yellow corded silk.  It has a rather stiff weight to it, so it works wonderfully as a winter garment.  I wore it outside for two hours earlier in December without feeling chilled (then my feet got cold).  It's lined with silk taffeta in the hood and lower sleeves.  Everything else is lined in plain white linen.

I made the waistcoat a separate garment (options!).  I wanted a little bit of extra warmth AND the option to use a stomacher front and quickly create a pet-en-l'air.  The trimming all over the garment is just pleated self-fabric.  I ended up doing death head buttons, despite promising myself I wouldn't (it's almost like an addiction).  However, the fabric just wasn't working well to cover buttons and metal seemed out of place.

As you can see here, the back is only one layer of fabric rather than two.  Lacing up the back allows for more adjustment in size.  Useful since the jacket is always adjustable.

You can also see the extra piece of fashion fabric at the back top.  The jacket neckline is lower so it wouldn't do to have white linen peaking out!

The jacket construction is just like a regular sacque back gown or jacket.  The laces across the lining in back keep the garment "fitted" to the body, although not so much as English gowns would be.  One of my ties apparently popped loose and needs to be re-tacked (oops).  The lining attaches to the fashion fabric just before it ends to keep from having too much of a sail on windy days.  I trimmed the separate sleeve cuffs with more pleats and silk ribbon bows.  The lower sleeves are separate and basted in.

The side pleats are a bit easier to see here.  Everything is double pleated and the side pleats do have pocket slits.  The back neck is finished with an extra piece that folds to the inside.  I chose to leave the skirts unlined since my fabric was weighty enough for all the pleating.  Much more would have been bulky, especially in back.

The trimming continues all the way around the hem.  The double back pleats (deep enough to just barely overlap inside) are tacked down on top for a few inches.  The lower sleeves have a few inches left open on the seam to get your hand through (they're rather tight) and possibly show off the lovely ruffles on your shirt.  The hem has a slight dip in length in back as well.

Pin the jacket to the waistcoat over a habit shirt with a cravat and pair with a matching petticoat and we're ready to travel! 

Wednesday, January 5, 2011

Hemming

Although it's often the last, and seemingly most simple, step in making a garment, there are a lot of choices that go into a hem. How high? How much turned under? Taped? Faced? Growth tucks? Or even embroidery?

Height mostly varies by class (or some "character" choices) due to the way a garment is used. A silk gown worn mostly inside can be two inches off the floor, or even train in formal situations. But if you're outside working over a fire pit, it would be filthy, ragged, or even dangerous. The general "average" that I like for late 18th century is 3-4". It stays off the ground, only gets dirty when it's raining, but it still looks very nice. I would never go more than 6" up. Even George Stubb's Hayworkers aren't more than 3" up. You aren't going to catch a hem on your shoe that high, nor would it touch the ground when bending over slightly. Be practical, it's easier to hem something another 1/2" or 1" up if it is becoming ragged than to let down.
When it comes to a matching gown/petticoat I usually make the petticoat 1/2" shorter, although I'm sure some of the mis-matched pieces I wear are an inch shorter. Much more and you might consider polonaising the gown to make it less obvious. I try to make all of my petticoats in that range, whether they have a ditto gown or not, since I don't re-enact a wide variety of classes (the fabric would be different quality any way).
Now, early 19th century follows the same rules of class and use, but tends to be longer in length. Walking gowns rise to the ankle, while many afternoon outfits even have trains. Formals are commonly seen with longer lengths in back. Riding Habits are also very long (compared to 18th century habits of normal heights).

The actual hem amount turned under is generally very small. It saves fabric that way. But, it doesn't mean you can't have an inch deep hem, I just wouldn't go much over that. Mine are usually 1/4" or 1/2" turned twice. I'm finding a slightly deeper hem common in the early 19th century, but I haven't researched that too much yet.
Now, there are two exceptions to this style of hem. Binding the bottom edge with a wool tape, often seen on quilted or wool petticoats (even more often with riding habits) allows you to have no turn up or just one turn. If you have a petticoat you want to go back-and-forth in lengths with (two wearers or two personas) that would work well since you would only have to stitch up the shorter length when needed. Or if you cut something a little too short and need that last inch.
Exception two; Silk gowns sometimes have facings. Usually a "cheaper" plain taffeta that seams to the bottom and can fold up a number of inches. Very often seen with trained gowns since it prevents a lot of dirt and wear on the expensive fabric. Easy and cheap to replace this way.

Growth tucks (or pleats) are something seen on many children's garments of the 18th century. Growing children and sharing clothing make them very practical. In the very late part of the century when gauzy dresses are coming into style (already very similar to a child's dress) we start to see them appear in adult clothing. They last through the 1860s. Usually around an 1" deep you can find examples with between 2 and 7 pleats (more later on). On a woman's gown it isn't meant to be adjustable, you even see them on trained gowns. In the 1820s they begin to pad the pleated sections, creating a precursor, perhaps, to the cage crinoline of the 1850s onward. Note on my first link, the lady on the right appears to have pleats, possibly decor on her petticoat. Whether it's an artists flare, formerly a fancier ladies, or a way to make due with second-hand and no cutting I don't know. Might be a fun challenge to seek out more of those!

Now, there is an oddity to how to hem; embroidery. Not just decorating a turned hem, but actually finishing it. Sometimes with scalloping along the edge. Not the most practical to make, but very pretty. Once again, it seems to come with the gauze trend. You do see it on under-petticoats of the 19th century as well.

Don't just look at what other people have made, take the time to do a bit of research specific to your year, fabric, and character. While museum extants show types of hems, their length is obviously skewed by the mannequins used. If you want to see good examples of fashionable lengths, fashion prints are wonderful. For more common folk of the 18th century, John Style's Dress of the People has many paintings of that class you can't easily find online.

Saturday, January 1, 2011

Happy New Year!

With the turn of the year, I sincerely hope things will be a bit more predictable. I'm hoping to get a post out every week. Between my husband's deployment, my mother moving, sometimes working three part-time jobs, running a business, and beginning construction on our third floor I've hardly had time to breath! So, let me catch you up with the projects I hope to feature this year. And, by all means, if you don't see something you want to know more about, please request it!

I've begun spanning more than just the 1770-85 range, moving into the 1812 period and even Civil War this year. With the anniversaries of both coming up soon I've had work for others that took me this direction. I do want to feature a little bit about those time periods, but how much will depend on your interest and response. But, to the garments completed and soon to show.

I did a few less traditional 18th century garments as well as the old staples in the last six months. Starting with a Polonaise Gown, not a gown which was polonaised, but the loose-fit front type. Then on to a Brunswick Jacket, complete with all the pieces. And beginning a hand-made pair of shoes. Even a "pirate" costume, which is really a very accurate 1700 fitted jacket from an original print. Of course, throw in another pair of stays to help rescue my old well-loved pair, a long cloak, and a simple wool gown. I've also begun a full suit for my husband.

As I posted about before, I made a simple 1812 gown and corset earlier in the year. I'm just now finishing up a more formal gown and an unusual undergarment to go with it. I've also got a riding habit planned and at least one more gown for that period.

I did get the opportunity to make a few 1860s clothing items (and even a 1840s gown for Dolley Madison), but they really aren't mine to post. However, between the upcoming 150th anniversary of the Battle of Williamsburg and the inspiration from said garments, I am looking to make a number of pieces from this time period as well. Right now, it looks like mainly the basics: chemise, corset, drawers, and hoop. I'm thinking of making a summer gown and a jacket ensemble, but we'll see as research progresses. I'd forgotten how hard it can be to start learning about a new time period!

What I would like to hear from all of you are the topics you're interested in. I will certainly do an inside-and-out on all of them, and I'm hoping to do an article on choosing proper fabrics. If you want to see more detailed instructions or research on any of the aforementioned items, let me know!