
I can say that I am SO glad I have a machine which does embroidery. The whole process is certainly complicated, but it only takes two weeks to do a massive quantity of work.
It all starts with a sketch. This helps me to layout the size and decide how the designs need to be broken apart to fit in the hoops.

From there I'll take tracing paper and make nice ink drawings with all the details. The lines on this one show where the design will extend past the hoop, so it will need to be separated somewhere.


I used mostly silk thread:
Light pink: Clover 036 (sz 50)
Mdm pink: Clover 037
Dark pink: Clover 055
Beige: Clover 043
Green: YLI 220
Lt Green: YLI 218
Gold: YLI 239 Silk Sparkle
Silver: YLI 224 "
Bronze: YLI 223 "

It all starts with a sketch. This helps me to layout the size and decide how the designs need to be broken apart to fit in the hoops.


I scan it into the computer and Photoshop solid colors into the areas, no borderlines. The colors have to be a bit extreme for the embroidery program to recognize the differences easily.

I'm still not sure I have a full grasp of the program, but I can get it to do most of what I need. Once the image is placed in the program it adjusts it based on the number of colors you say you want (helpful if you're doing a photograph, etc). Then I just click on each color section to turn it into embroidery. This has to be done in order, with separate colors so it will tell you when switch threads. I used a satin stitch, the stitch angles were all changed to correspond with the original.

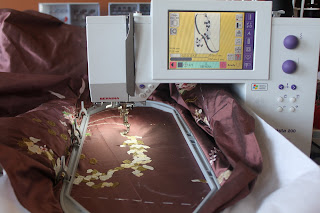
I can either test out the embroidery using cheaper threads (which I did to almost all of the designs) or print off the pattern to give me placement marks. This is what I called a connecting piece. It's what went between the major designs and had to be adjusted into four different designs in order to match up at the right angle. Testing both sides four times each would have been more than necessary, so I just printed.
You can see how the long feathers are actually broken up into sections. This is to allow me to gradually adjust the stitch angle to have it follow the curve.

Some of my designs I marked with thread for hoop placement. The connection pieces were more adjustable, so I would chalk in the shape and find where the marks needed to sit to match up the design, then just chalk in the placement marks. They didn't have to last very long. I would make a few final adjustments on the machine. Some were to move the design into the exact place. I also adjusted some of the other numbers to give the right effect. I set the stitch fill to 90%, told it to adjust by .2 mm over the edges (they say it's for pull compensation, I use it to get rid of spaces between small designs), and set the maximum stitch length to 8mm.

Light pink: Clover 036 (sz 50)
Mdm pink: Clover 037
Dark pink: Clover 055
Beige: Clover 043
Green: YLI 220
Lt Green: YLI 218
Gold: YLI 239 Silk Sparkle
Silver: YLI 224 "
Bronze: YLI 223 "

18 comments:
Jealous!
WOW! That is gorgeous, amazing, fantabulistic :)
I am completely stunned, YOU ARE AMAZING!
Thank you for the extra information about digitizing. I think it will help the next time I sit down to try it.
I've also been wondering if I could use real silk threads,so thank you again for listing which ones you used. It looks amazing!
This project is so "WOWWWW"!!!
And it shows how much needlework it was back then - both the original and the recreation are masterpieces!
Sabine
Wow that surely looks complicated! But the result is beautiful!
This is absolutely stunning in its final results! And so interesting to see the process.
I have always wondered how using an embroidery machine for creating historical designs on costumes would work out. And now I know!
Simply lovely!
Wow! It looks so fantastic!
What machine do you use for the embroidery? And would you still recommend it to others?
I have a Bernina Artista 200 and I would highly recommend Berninas to anyone! I've used their basic models in shops, which manage to survive a lot of abuse, and they have some gorgeous embroidery machines (one with an extended arm!!).
Beautiful! It's so helpful to see how you go about getting your design from the paper into actual embroidery. I'm in the process of learning Digitizer Pro so that I can eventually teach it and geez can it be difficult!
This is so neat! So many historic clothes are embroidered and it is great that you've found a way to achieve that look without the intense hours of hand stitching! Very inspirational and I love that you've also shown and explained your process.
Quinn
www.quinnmburgess.wordpress.com
Wonderful!
appreciated!
Well Done Online Digitizing Service
Wonderful!
Post a Comment