Sunday, December 6, 2015

Steampunk Harley Quinn

Teslacon also had a secondary event on Saturday night with a Night Circus theme. We actually had a real old-fashioned circus come and perform (acrobats, a strong man, jugglers, etc) as well as an aerial team. I changed up my dancehall ensemble for something a bit...darker. I originally started brainstorming by looking up Victorian fancy dress. I really loved some of the harlequin outfits, but there wasn't any good harlequin fabric online that I could find. But just before giving up, Angela Burnley had an attic sale and was selling the absolutely most perfect fabric!! From there I started designing a harlequin fancy dress, but realized I was missing out on the fun part of Steampunk- the crazy punk part. It didn't take much to rework the design to fit doing a Steampunk Harley Quinn and I set about trying to figure out how to make a giant hammer...

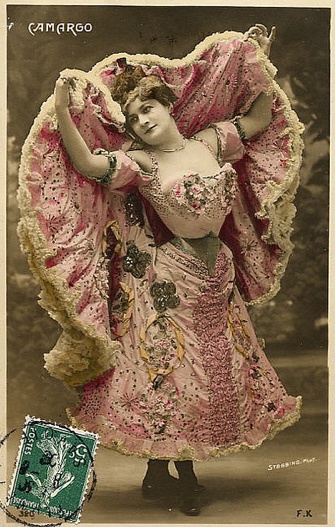
Ok, so lots of layers. The base is a red silk taffeta corset and red cotton bustle pad. The skirt is then made from black cotton with pleated black silk taffeta around the visible bottom. Over that the two swags are a metallic gold/black fabric. The bodice is from the harlequin fabric I lucked into, lined in the gold and piped in the red silk with more black pleating. The mitts are silk net.

I also threw on a patent leather belt I already had and made a tiny hat based on one of the fancy dress images. The wig I'll talk about more below.

I almost didn't do the bustle style back, but I'm so glad I did! Also, the awesome tights I found at Hansel from Basel and shoes from Remix. This was definitely one of those magic outfits that came together in just over a week.

I looked over some of the 1870s/80s patterns in Patterns of Fashion and Cut of Women's Clothes, but I had to alter it so much I can't really point to one that's similar anymore.

 The hammer was the hardest part for me since this is definitely out of my comfort zone. Thankfully a good friend and my husband came to the rescue and helped me figure out supplies and assembly (which happened in about two days at the last minute). The base is a sonotube with wood veneer from a craft store gorilla glued around it. The ends are a decorative block of wood we found, the handle a dowel rod, the topper is from a curtain rod, and then the copper straps are electrical tape with fabric tacks! A quick staining the night before I left and I was good to go (aside from the fact that my car smelled like stain for the 7 hour trip).


First time trying to draft my own corset from scratch not based on a historical pattern. I ended up with 12 pieces per side and it fits so perfectly! It's just one layer of coutil with the seams top-stitched and folded over to make casings. I boned it with the plastic German Whalebone because the zipties I had weren't long enough. I need to make more modern corsets now...

It's hard to tell with all of the layers on top, but I've got really high hips and a very abrupt waist to hip change which makes many corset styles painful (stays are great though). I finally managed to get this design to work. Not a ton of waist reduction, only about 2-3" when first lacing in.


The bodice I decorated with jet black beads on the shoulders that have fallen off of a deteriorating Victorian mantle I have for parts (black silk has no hope) and some brooches and buttons I already had around. The obsession with sparkly jewelry is genetic in our family, so I've got a good collection!


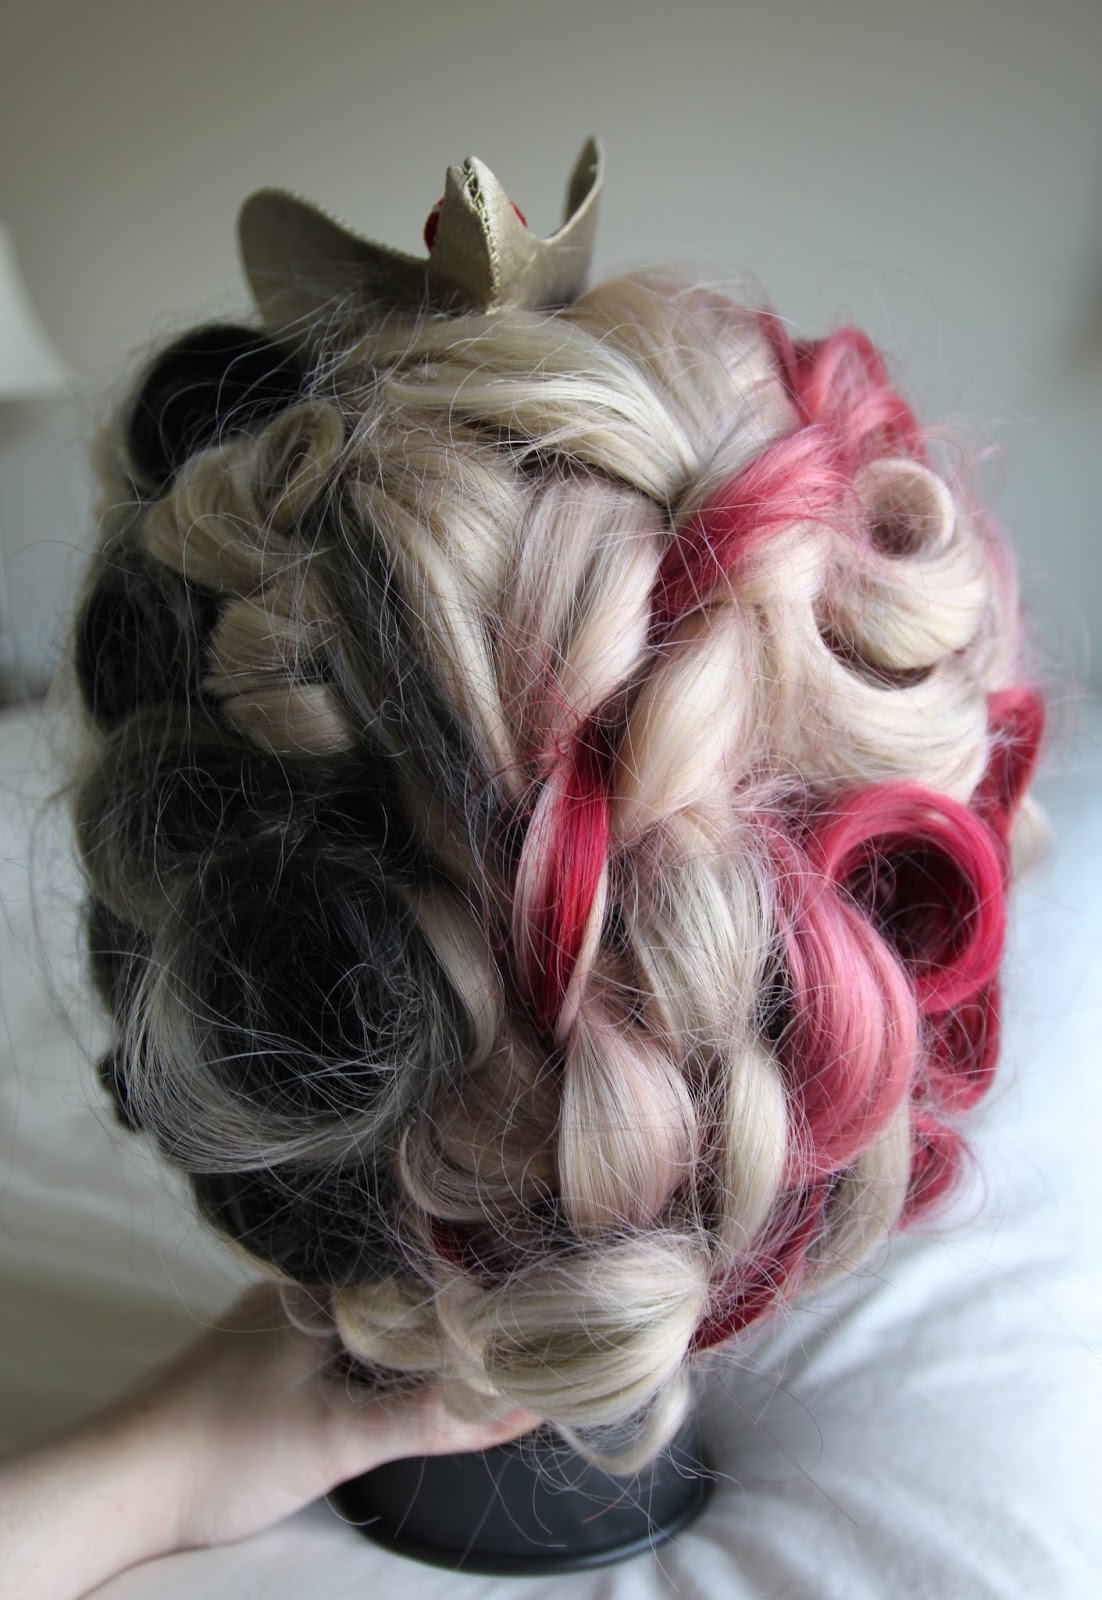
 And then there's the wig. I purchased the wig and two extensions from Arda Wigs (Glinda and long curly clips). The extensions were first cannibalized for strands of hair to put a lace front on the wig. I do not have a high forehead and putting a regular wig far enough forward to cover my now dark hair just looks weird apparently. Next time I'm just buying a pre-done lace front style. The two extensions were then dipped into some Rit dye to try to get an ombre effect. A lot of bobby pins later I managed something that is vaguely based on some 1870s hair fashions with loads of extra curls on the sides. Oh, and the adorable hat has two silk velvet pompoms on it. For some reason, that was the most satisfying bit of the project!


Wednesday, November 25, 2015

Dance Hall Girls II

So, as the months went by the embroidery began to take shape. Using the wire lace for the swirls saved me a great deal of time and headaches.


I also began the work of patterning and building up the bodice. I based it on evening gown bodice shapes from the 1890s. I wasn't sure of the design I was going to use just yet, so I went ahead and covered the twill underlayer with some cheap dupioni I had laying around.
Most of the images show a very strong nip in at the waist and rounding around the rib cage, something I tried to do, but not being "corset shaped" in my torso it wasn't as extreme.

The interior was finished and structured like evening bodices of the time as well. I used cable ties for the boning and silk grosgrain ribbon for their channels.

I started drawing in chalk on the bodice to play with final form ideas.

I crammed most of the actual assembly into about one week, the petticoat taking up the most time.


When I started constructing the skirt it became apparent very quickly that I had made the whole thing WAY too big. I started out planning about a 150" hem, but the embroidery was just swallowed by the fabric folding back in on itself. So, looking at some of the original images for ideas, I took the seams in numerous inches and made pleated sections so that the hem would stay large enough for movement, but would be smaller when let down.

The bodice was fairly simple construction, but as you can see in the pictures above I ended up with the front buckling with use. I had left the bones free for the top few inches like you see in originals, but since I wasn't wearing a corset underneath the now three layers of stiff fabric still couldn't hold it up. So, mid-day I took the outfit off and tacked the front five bones all the way up (also tacking the organza pleats down). It fixed the issue, thankfully!

Adding in that the shoes are actually a 1780-style pair I made to wear for work earlier in the year (I just chose my colors wisely). The tights are ballet tights and I did make a super fast pair of fitted satin "knickers" of a sort just in case I was going to flash anyone with the petticoat.

The satin covering the bodice was made up separately, the bottom folded under and slip-stitched to the lining. The top edges were folded over the under-bodice and all of the raw edges were covered with bias fabric. I tacked through all of the seams and darts to the under-bodice as well, so it wouldn't shift around.

The two back panels were left loose and lined so they could be pulled back to access the lacing.

The pleated green organza was tacked to a panel of satin which hooked across the lacings, the two satin back panels then hooked to each other at the bottom half.

I originally planned 6-8 tiers of about 6" wide ruffles. However, once I made up the first tier it was obvious that the layers would just fold in on themselves and the fullness had to be achieved some other way. I looked at the images again and they all had a much smaller ruffle along the edge which kept the large ruffles from staying flat. So, keeping in mind the yardage I had (about 10 yards pre-pleating), I went with four tiers instead. Overall I hemmed about 150 yards of organza ruffles. The four ruffles are all close to the bottom edge of a roughly 12"x150" unpleated piece that gathers at the top to a small circle.


Tuesday, November 24, 2015

Dance Hall Girls

Before I get started, hello again! I know it's been a while, but this year alone I interned in the Margaret Hunter Millinery Shop, worked on George Washington's Marquee Part 2: The Dining Tent, and moved to Omaha, NE. Quite a change in location, which will mean some changes for this blog. But, now that I'm settled the first step is to start posting again!

This years Teslacon storyline took us to Texas to be a part of the Wild West. With the busy schedule I settled on a long-term single outfit that I could pick up off and on for a few months. We had been embroidering a great deal in the shop and I wanted to use that in my design. I settled on a show-girl style costume, the type seen in cabinet cards advertising the Follies Bergere and other similar shows. It may not be the most accurate to put such costumes in the West, but the 20th century does again and again in movies, so I'll claim that part as good enough and try to make the garment itself heavily based in surviving images. While the bodices often do closely resemble 1890s evening gowns, they are their own style and I have yet to find a surviving example. So, images it was.


I didn't use a single image to copy, but tried to pull in lots of elements (loads more on Pinterest). I really should have made the whole thing much gaudier to be stage-appropriate, but since I wasn't going to be on stage I just wasn't fond of that idea.

I managed to find some amazing double sided silk satin on Etsy to start. I decided to design the embroidery using Aesthetic Movement styles and set about sketching. The embroidery thread is un-spun Japanese silk.

I also managed to find silk passementerie on Ebay, coming from Portugal, to trim the edges with.

The final colors chosen. I went with the green side as the main color so the pinks would pop better.

I knew I was going to need an absurd amount of ruffles for the petticoat. Looking at the images, most appeared finely pleated rather than gathered. Organza seemed like it would have the best hand and resembled the images as well, so I ordered about 10 yards and sent it off to International Pleating in NYC to save my sanity (it's really not expensive and there's no minimum!).

During the Spring I started sketching out the embroidery designs, settling on four different panels. I found inspiration in everything from spoons to wallpaper.

I estimated the size/shape of the 8 panels I would need for the skirt and seamed pairs together to start embroidery. The seams I felled over. I scaled up the embroidery designs and sketched them on with chalk, detailing with pencil. I worked off and on on the embroidery between April and the end of October.

To be continued....(tomorrow)


Sunday, March 22, 2015

1815 Pelisse

Realizing today how much my list of un-blogged costumes is piling up, I figured I should at least try to get through New Orleans before I forget too much about it!

First up is my very warm Pelisse. I'm so so so glad I made this garment, as the event was nearly freezing cold (I got wind-burn on my face!). The main fabric is a lovely butter-yellow camlet trimmed in green silk velvet and lined in bright yellow silk taffeta. I based the design on these two fashion plates. I didn't use a specific pattern, but took inspiration for the right shapes of the time from Janet Arnold and Norah Waugh.


One of the hardest parts of the piece was getting the silk velvet to lie flat even while working around so many curves. The front closed by way of tiny button/buttonholes and a large hook under the belt.

Each one of the capes was made up separately, lined and trimmed. This put a lot of bulk into the neckline and if I did this again I'd actually work the seam allowance there open rather than folding it all into the bodice.

The collar itself is two pieces and velvet on the underside. The hem actually sits a few inches above the ground, the back is held out slightly by a small pad at the waist but is longer than the front.

Thankfully I thought ahead and co-ordinated my entire wardrobe so I could wear the pelisse over my other ensemble the next day. Just a change of hat and gloves to bring it all together.

I really did mean a "bright" yellow silk lining!

Construction was very simple. The bodice, skirt, and sleeves were made separately and I left the edges raw inside. If I was going to wear this often I might whip over the waist seam, but I've never had problems with raw armscyes unless the fabric is prone to bad fraying.

Up close there's quite a bit of visible stitching. I found I had to top stitch the velvet on otherwise it rolled and tricked me into thinking I had it flat.
Samantha and I posed on the front balcony of a lovely museum house.

Wednesday, January 21, 2015

Everlasting Ringlets

Earlier this month I attended the Battle of New Orleans bicentennial event. I spent two days in costume wandering about the battlefield as well as the French Quarter, including a lovely ball I attended the second evening. I made quite a few new pieces, which I'll get to soon, but first I wanted to talk about hair! It's constantly a problem to keep those beautiful curls bouncing for an entire day through all of the abuse. Usually I use a modern setting lotion, wet set pin curls, and a good shellacking of hairspray to keep them from sagging. But this time around I left the modern methods at home and took the opportunity to experiment with the method women of the time were using.

My friend, Abby, has been studying haircare of the 18th century, particular the use of pomatum and powder in both styling and cleanliness. So, I brought with me a bit of both to put them through a trial by fire.

I wet my hair the evening before, worked the pomatum through, and put my whole head up in pin curls. That morning I took out the curls and found they were so well ensconced I couldn't get them to do the spiral fall I was looking for on the sides. I think the problem is in my short hair and the lack of weight needed. So, I pulled out a small barrel curling iron (something they would have had, but I don't think the hotel would have appreciated a brasier being lit in the bathroom) and encouraged some of the curls into the proper shape. The curls on top I left alone as they seemed to lay well. I also decided to forgo the powder since the finish already looked very similar to portraits of the time.

This was soon after arriving to the site, with brisk winds that actually gave my face windburn that day. Despite all of the tousling, the curls were perfect.

A few hours of walking about the site later, still no loss of curls!

The next day I used the same technique, only rinsing my hair and adding a bit of pomade to achieve the wet set pin curls. However, my other hat sat much further down on my head (something I need to fix), so it spent almost all day squashing the poor curls I had so tediously set!

But all was not lost! I reset the curls for a couple of hours before the evening event and fixed up a bit with the curling iron again. Mind you, the most squashed part (the top), I never used the iron on and it still bounced back with just a bit of pinning while dry. So, after at least 15 hours my very straight hair was still very willing to curl just perfectly!

Prior to the event I tried a few small curls set for three hours that I then brushed and ran my fingers through and this is what resulted after all of the abuse. Needless to say, taking my hair down after the event I looked like orphan Annie. 1780s hedgehogs anyone?

I've still got a number of tests I'm planning to put this system of haircare through, but I hope you will too! Check out Abby's Etsy shop here!