Part two of Fitting Regency Gowns. Thankfully YWU and FR have been saved, so I give this second part gladly!
Gathered neckline pulling
How much gathering occurs in a neckline and where it is
placed can be affected not only by the overall size of the neckline, but the
shape as well.
This particular shape of
neckline on Gwendolyn does best when the gathers are concentrated toward the
front and do not continue up the shoulders (24).
If the gathers are spread out, up the
shoulders, the armscye becomes very full and wavy(25).
The reason this doesn’t work is that this
bodice shape has a squared neckline, as shown on the right (26). The bodice on left is made to gather up the
shoulders, sloping outward, allowing the gathering to be diagonal toward the
underbust rather than horiztonal toward the shoulder. You’ll see the finished garment of this
pattern in the next section.
Wrong waistline angle or Gaping underbust
If the underbust does not have a drawstring in it, it can be
difficult to make it snug enough to not gap, particularly in the back. There is also an issue of the waistline
drooping in back, rather than angling up slightly as is appropriate.
The easiest way that I have found to find the
perfect waistline size and angle is to pin a tape around the waist and attach
the bodice to it (27). It’s especially
helpful with gathers under the bust to know how much to gather in to.
Sleeve issues:
Shallow Top
If the sleeve head is too short, it can create numerous
problems. It is very likely to pull at
the shoulder strap, causing it to gap, wrinkle, or even pull off the
shoulder.
You’ll also see wrinkles
angling from under the arm towards the top center (28).
That means that the underarm is too high
compared to the top of the sleeve, most often because the top is too short
rather than the bottom being to high (29).
If you dip out the bottom, particularly on a longer or fitted sleeve,
this could bring the narrower circumference up higher, making the sleeve too
tight.
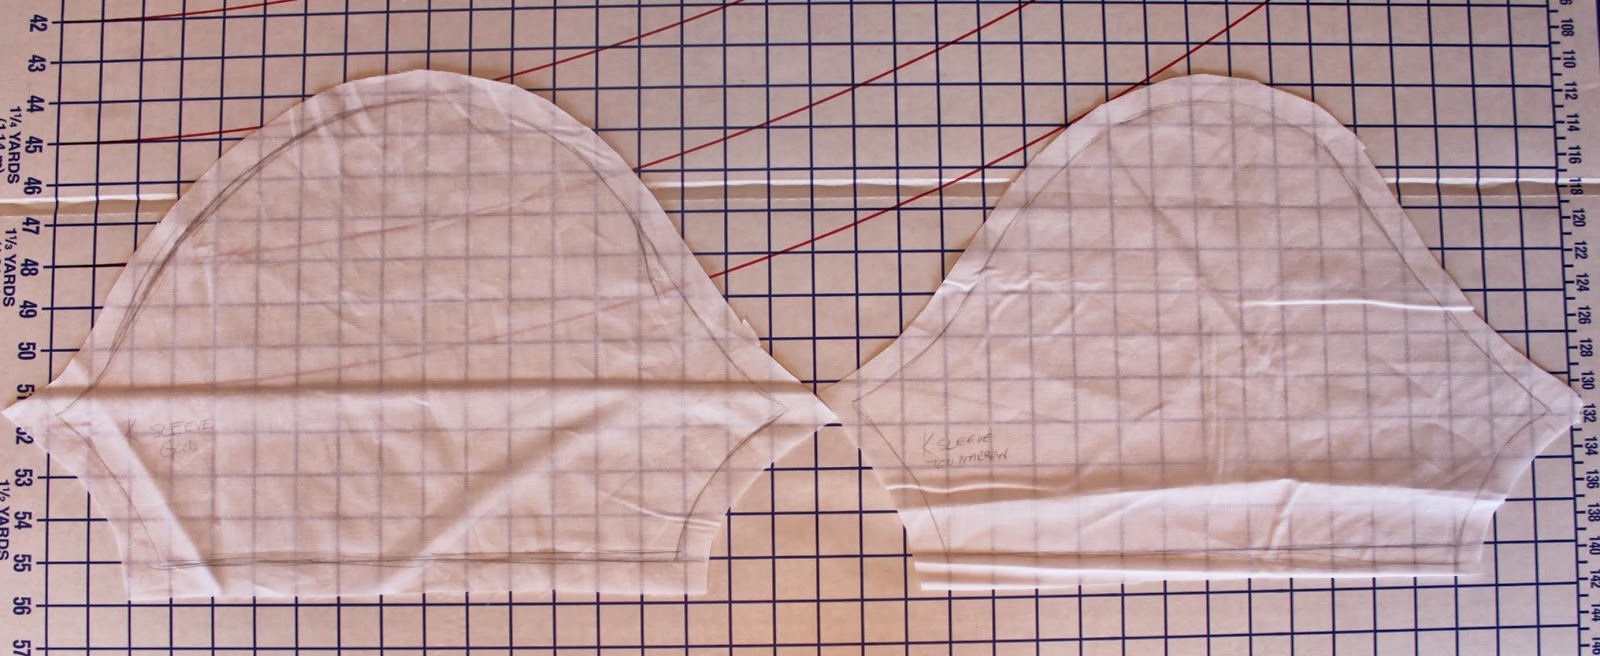
Narrow Top
If the sleeve head is too narrow it will prevent the arm
from raising, pull greatly on the bodice shoulders, and possibly even create
horizontal pull marks across the arm (30).
A wider curve, possibly even a flat section along the top, can fix this
problem (31).
Restricted movement
Even if the sleeve head does not seem too narrow or too
short, there may still be problems with lifting the arm or reaching out in
front (32). It’s very common with fitted
sleeves or the narrow backs of the time period.
You could bring your armscye further out on the shoulder or further up
under the arm. However, you don’t have
to sacrifice a narrow back or have a seam cutting in under your arm.
The sleeves can be adjusted to fit, just
expect that there will be wrinkles in the back (33).
This allows the arm to raise up without
pulling on the bodice (34).
Making the
back corner more square allows for this (35).
You can also make the sleeve fuller to allow for more
movement, or because of style preference.
I generally increase the width of mine from a fitted sleeve
one-and-a-half times. The very simple
way of doing this is to take a fitted sleeve pattern which fits you and the
gown, then cut it into strips.
Filling
in the lines between the spaced strips will give you a fuller sleeve (36). Err on the higher side when connecting lines,
possibly adding a small allowance to the top and/or bottom of the sleeve to
have it “poof” out more.
Skirt issues:
Pulling across front
When flat-fitted fronts are brought all the way around to
the back for gathers to begin, there are often wrinkles across the front where
the gown is trying to fit over the hips.
There are a few solutions to this issue.
First is to use panels with angled seams. There are a number of examples of this style in Patterns of Fashion 1 and The Cut of
Women’s Clothes. Another option is to
place fullness at the very side, either in the form of a pleat or gathers. Even though you don’t often see this in
portraits, it can be well hidden under the arm.
In this last section I’m going to show four of my gowns from
the Regency period and talk about what does, or does not, fit well.
The first is of the style of the 1790s (37). This is the gown to which the gathered front
pattern belongs to above. The neckline
gathers up well, not pulling or placing too much fullness on the
shoulders. Depending on how I move the
gathers the neckline can be more round or square. The main issue comes with the sleeves.
They are not quite wide enough to fit into
such a small back (38). If my shoulders
were set further back, it would be fine.
It would be best (if made again) to move the armscye forward in front
and back or to add extra to the sleeve in back.
It’s difficult to fit to a narrow back with fitted sleeves. The fullness in the front of the skirt means
I don’t have to worry about pulling over the hips, although when I tried to
place the pleats in back between the seams the fabric wanted to pull the skirt
into a tight roll rather than fanning out into a train.
The next gown is based on an 1805 extant (39).
In this case, the sleeves fit well and allow
for great movement, no tightness across the back (40). Comparing to the original they could have
been slightly fuller. There was a slight
gaping under the bust, so I finished the seam with a drawstring. It only slightly pulls in, so no visible
gathers. The skirt is made up of four
pieces; a front with angled sides, two side pieces with only one angled side,
and a straight back. My main issue with
the gown is that the front bodice panel should have been wider. It pulls snug across the bust and the
original seems to be looser to allow the center front to drape down
slightly. I place a gathering cord
center front to pull it down, but it does not want to easily.
Third is an 1812 style (41).
I have no major issues with this one, but having a drawstring across the
front neck and the back, gathered sleeves, wide back, and a snug waistband make
for an easy fit (42). This skirt was
also made with angled pieces (as you can see from the stripes), but there is
also gathering around all but the very front of the bodice.

The last is based on a fashion plate from 1816 (43). I am still in the process of building this
one and working out the kinks. The
sleeves will be drawn up (as the left one is), but this shows you the overall
length and size of a fuller sleeve. My
main issues come with the bodice front and undergarments. I originally draped this bodice to go over a
corset, however, the straps of the gown were set too far out and showed the
corset straps and shift neckline. I
might have to adjust the darts later once I find the right style to hide underneath. The other issue is that the stripes need to
run vertically, but this can be a problem with crossed necks. I had to adjust the waistline of the bodice
down to keep the neck from gaping, but this puts annoying pulls
horizontally.

The skirt does fit well,
owing to a 2” pleat on either side, just under the arms. I am thinking about making this pleat deeper
to fix the slight pull seen in the back view (44). However, it has yet to be hemmed and I want
to see what happens when the hem is free from the floor.
When constructing a garment, search through as many sources
as possible. Look at period artists,
particularly Sir Thomas Lawrence, Louise Élisabeth Vigée Le Brun, Vladimir Borovikovsky, Gilbert Stuart,
Jacques-Louis David, and Henry Raeburn.
Fashion plates can be useful, but they lack detail; particularly of
wrinkles, darts, and seams. And, as
always, look to other costumers garments for their triumphs and tribulations.