Showing posts with label Petticoats. Show all posts

Wednesday, January 5, 2011

Hemming

Although it's often the last, and seemingly most simple, step in making a garment, there are a lot of choices that go into a hem. How high? How much turned under? Taped? Faced? Growth tucks? Or even embroidery?

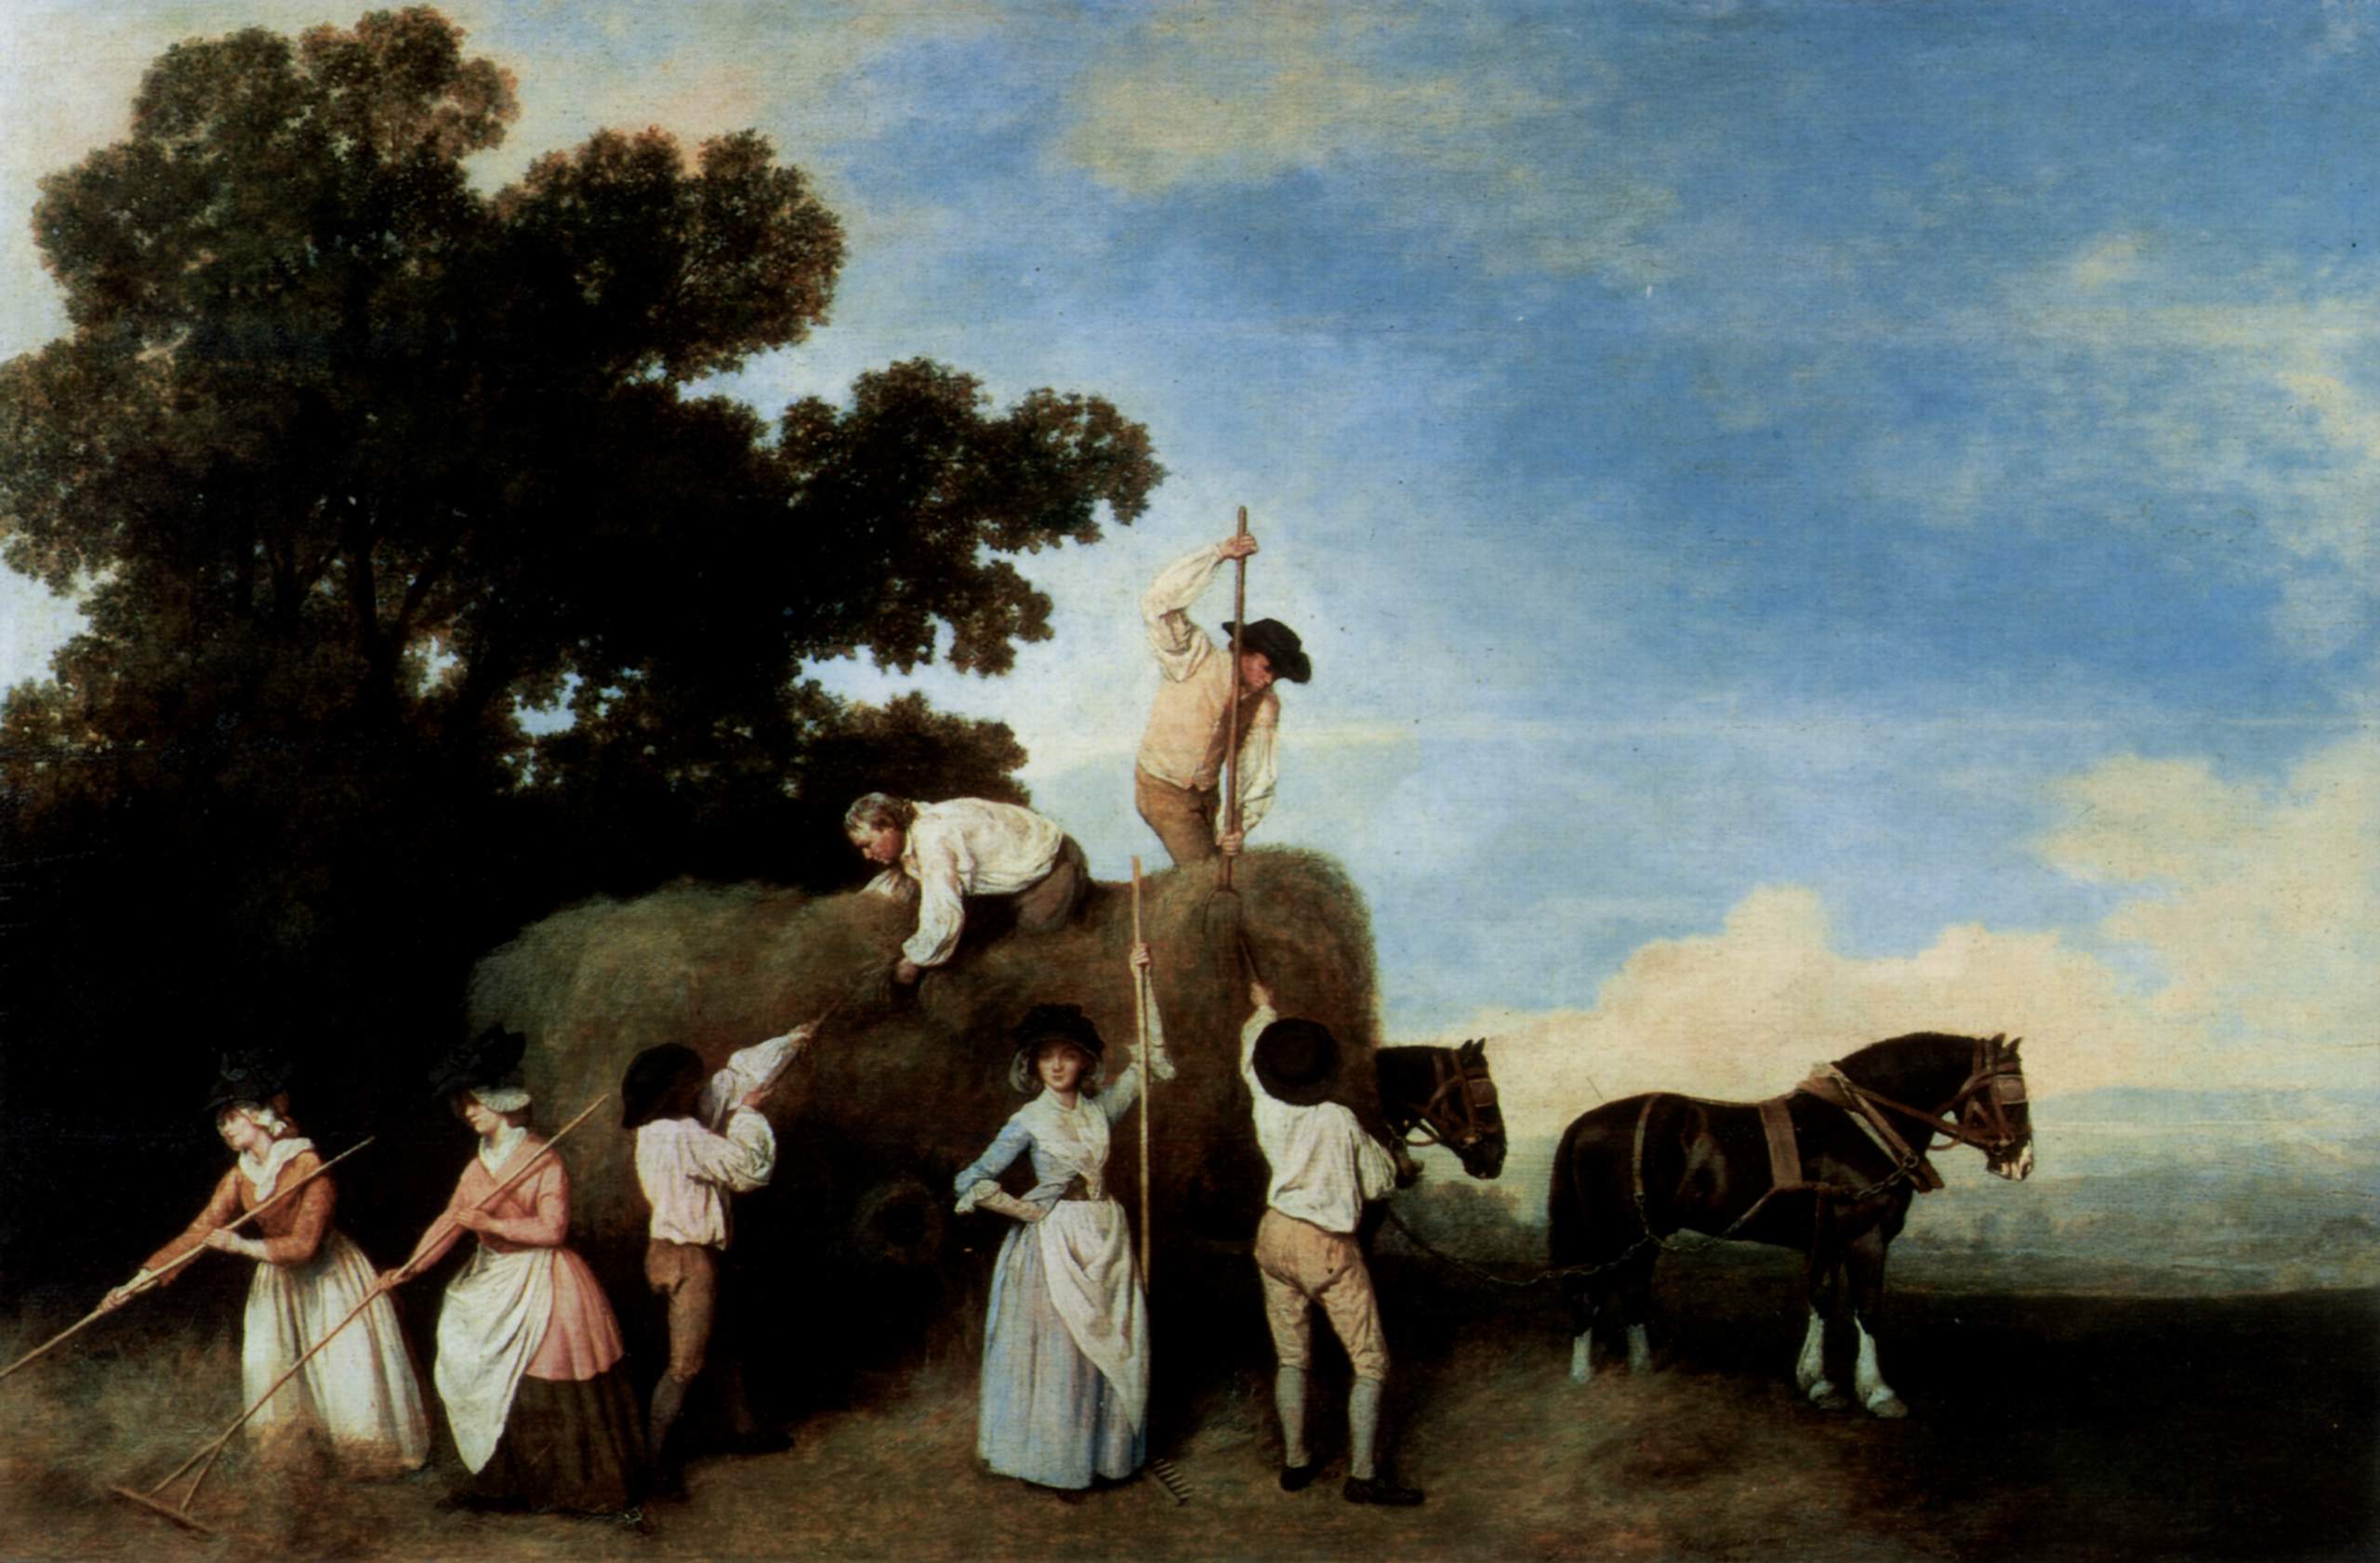
Height mostly varies by class (or some "character" choices) due to the way a garment is used. A silk gown worn mostly inside can be two inches off the floor, or even train in formal situations. But if you're outside working over a fire pit, it would be filthy, ragged, or even dangerous. The general "average" that I like for late 18th century is 3-4". It stays off the ground, only gets dirty when it's raining, but it still looks very nice. I would never go more than 6" up. Even George Stubb's Hayworkers aren't more than 3" up. You aren't going to catch a hem on your shoe that high, nor would it touch the ground when bending over slightly. Be practical, it's easier to hem something another 1/2" or 1" up if it is becoming ragged than to let down.
When it comes to a matching gown/petticoat I usually make the petticoat 1/2" shorter, although I'm sure some of the mis-matched pieces I wear are an inch shorter. Much more and you might consider polonaising the gown to make it less obvious. I try to make all of my petticoats in that range, whether they have a ditto gown or not, since I don't re-enact a wide variety of classes (the fabric would be different quality any way).
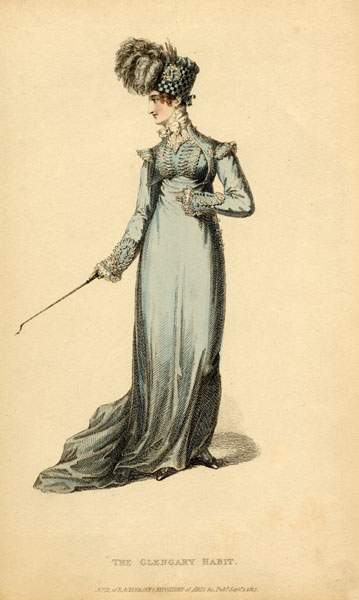
Now, early 19th century follows the same rules of class and use, but tends to be longer in length. Walking gowns rise to the ankle, while many afternoon outfits even have trains. Formals are commonly seen with longer lengths in back. Riding Habits are also very long (compared to 18th century habits of normal heights).

The actual hem amount turned under is generally very small. It saves fabric that way. But, it doesn't mean you can't have an inch deep hem, I just wouldn't go much over that. Mine are usually 1/4" or 1/2" turned twice. I'm finding a slightly deeper hem common in the early 19th century, but I haven't researched that too much yet.
Now, there are two exceptions to this style of hem. Binding the bottom edge with a wool tape, often seen on quilted or wool petticoats (even more often with riding habits) allows you to have no turn up or just one turn. If you have a petticoat you want to go back-and-forth in lengths with (two wearers or two personas) that would work well since you would only have to stitch up the shorter length when needed. Or if you cut something a little too short and need that last inch.
Exception two; Silk gowns sometimes have facings. Usually a "cheaper" plain taffeta that seams to the bottom and can fold up a number of inches. Very often seen with trained gowns since it prevents a lot of dirt and wear on the expensive fabric. Easy and cheap to replace this way.

Growth tucks (or pleats) are something seen on many children's garments of the 18th century. Growing children and sharing clothing make them very practical. In the very late part of the century when gauzy dresses are coming into style (already very similar to a child's dress) we start to see them appear in adult clothing. They last through the 1860s. Usually around an 1" deep you can find examples with between 2 and 7 pleats (more later on). On a woman's gown it isn't meant to be adjustable, you even see them on trained gowns. In the 1820s they begin to pad the pleated sections, creating a precursor, perhaps, to the cage crinoline of the 1850s onward. Note on my first link, the lady on the right appears to have pleats, possibly decor on her petticoat. Whether it's an artists flare, formerly a fancier ladies, or a way to make due with second-hand and no cutting I don't know. Might be a fun challenge to seek out more of those!

Now, there is an oddity to how to hem; embroidery. Not just decorating a turned hem, but actually finishing it. Sometimes with scalloping along the edge. Not the most practical to make, but very pretty. Once again, it seems to come with the gauze trend. You do see it on under-petticoats of the 19th century as well.

Don't just look at what other people have made, take the time to do a bit of research specific to your year, fabric, and character. While museum extants show types of hems, their length is obviously skewed by the mannequins used. If you want to see good examples of fashionable lengths, fashion prints are wonderful. For more common folk of the 18th century, John Style's Dress of the People has many paintings of that class you can't easily find online.

Saturday, July 26, 2008

Perfectly Pleated Petticoats

Yet another essential part of the 18th century woman's wardrobe was the petticoat.  You can't go around wearing breeches after all!  They can be made from linen, cotton, or silk.  They can be made to match a gown or as a separate piece.  They attach at the top by splitting in half
 (also allowing for openings to reach the pockets) and the front and back have ties which wrap around the waist separately.  The most complicated part of a petticoat is its pleating.  Up until 1780 I'd recommend 1/2" pleats, which is what I use in the formula below.  After that, you can choose to do smaller pleats.  The same progression occurred with the gown as I'll talk 
about another time.
The first step is do to some measurements. Put on your shoes for this.  First, you'll need your waist.  Next measure from the center front of your waist line to the floor, then side, then back.  There might not be much difference there, I'm only 1" shorter in front.  Dipping down the top before pleating means I don't have a curvy hem.  Particularly useful when wearing hoops and the difference is great.
When purchasing your fabric, the first thing you need to know is how many panels you will require.  Most petticoats use either two or three widths of fabric; 100" to 120" is a good normal range.  A finished petticoat should be about 3" off the ground and the hems were often narrow (1/4" turned twice) or faced with tape.  If you're going to be working in the petticoat (ex. cooking over the fire) a couple inches shorter is fine.
Once you've purchased and washed the fabric, it's time to cut the panels.  Cut across at the fabric the panel length we determined earlier (side to floor minus 1").  If you have three panels, this process will be a bit different, so skip ahead to your own section below.  Otherwise we need to curve the top.  First, find the difference between the front and side measurements.  Mine are 39" and 40", so I have a 1" difference.  Find the middle point at the top of one panel.  Mark down that difference and mark half-way between the center point and the side at top.  You'll create a curve as shown below.

For two panels, you'll stitch up the side seams stopping 9" from the top.  By hand, I use a combination of running and occasional back stitches.  The top 9" you'll fold the seam allowance back, then fold the edge under to hide it (like a roll hem).  Use small whip stitches to tack it down.  I also recommend putting a thread bar at the bottom of opening to keep the stress of the seam.

For three panels, stitch all the way up all three seams.  By hand, I use a combination of running and back stitches.  One seam will sit at center back and the other two will end up on your side fronts.  Find your center front point at the middle of the front panel.  Match the center back and center front points.  Lay it out flat and the folds should lie where your side openings will be.  Mark and cut a 9" line straight down from the top and these points.  Roll and hand-stitch the raw edges back.  Around the bottom do a hand button-hole stitch and a thread bar.
Next comes the pleating.  Find your waist measurement and also measure the front or back half of your petticoat.  Before you start, is this to go with a gown or is it separate?  If you're going to use a gown, you'll have a 5" pleat at center front.  Otherwise, I recommend a 3" pleat.  You'll see two different formulas, the first one for the 5" and second one for the 3".

"Waist" is your total measurement
"Fabric" is just the front or back half of your petticoat
Round to the nearest 1/8" for "per pleat"

Front
Waist = _____ / 4 = _____ - 2.5 = _____ x 2 = _____ pleats     (gown)
Waist = _____ / 4 = _____ - 1.5 = _____ x 2 = _____ pleats    

Fabric = _____ / 2 = _____ - 2.5 = _____ / pleats = _____ per pleat
Fabric = _____ / 2 = _____ - 1.5 = _____ / pleats = _____ per pleat

Place pin center front (CF).  Place a pin on either side either 2.5” or 1.25” out from CF.
Next pin goes ______ (per pleat) further out.  Place one 1/2” in from last pin.
Repeat until correct number of pleats has been marked.  The last 1/2” should be at the very end.
If the last pleat doesn’t end in the correct place, determine the amount off.  It should be less than amount per pleat, but more than 1/8”.
Subtract or add 1/8” to pleats working from the end in until it evens out.  (If you’re 1/2” over, the last four pleats need to be 1/8” less than originally planned.)
Fold pin to pin with pleats facing out, leaving larger CF pleat as measured.

Back
Waist = _____ / 2 = _____ pleats
Fabric = _____ / 2 = _____ / pleats = _____ per pleat

Place pin CB.
Next pin goes _____ (per pleat) further out.  Place one 1/2” in from last pin.
Repeat until correct number of pleats has been marked.
Adjust the last pleat distance to 1 1/2” including the 1/2” marking.
Move sets according to front directions to correct.
Fold pin to pin with pleats facing inward.

Do a running stitch 1/4" from the top to fasten the pleats down.
Cut two strips of 1" tape (cotton twill or linen) half of your waist size plus two tails of 30" each.  Fold it in half over the raw edge on top and stitch down.  Make sure to roll and stitch the ends of the tape.
To hem, try it on and make sure it's even with the floor.  If not, have a friend go around and mark 3" above the ground with pins.  Leave 1/2" past your finished length.  Roll and stitch with a slip stitch so you won't catch it on your heels.