Teslacon also had a secondary event on Saturday night with a Night Circus theme. We actually had a real old-fashioned circus come and perform (acrobats, a strong man, jugglers, etc) as well as an aerial team. I changed up my dancehall ensemble for something a bit...darker. I originally started brainstorming by looking up Victorian fancy dress. I really loved some of the harlequin outfits, but there wasn't any good harlequin fabric online that I could find. But just before giving up, Angela Burnley had an attic sale and was selling the absolutely most perfect fabric!! From there I started designing a harlequin fancy dress, but realized I was missing out on the fun part of Steampunk- the crazy punk part. It didn't take much to rework the design to fit doing a Steampunk Harley Quinn and I set about trying to figure out how to make a giant hammer...
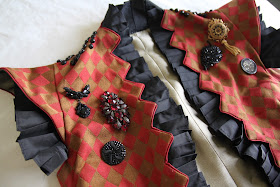
Ok, so lots of layers. The base is a red silk taffeta corset and red cotton bustle pad. The skirt is then made from black cotton with pleated black silk taffeta around the visible bottom. Over that the two swags are a metallic gold/black fabric. The bodice is from the harlequin fabric I lucked into, lined in the gold and piped in the red silk with more black pleating. The mitts are silk net.
I also threw on a patent leather belt I already had and made a tiny hat based on one of the fancy dress images. The wig I'll talk about more below.
I almost didn't do the bustle style back, but I'm so glad I did! Also, the awesome tights I found at Hansel from Basel and shoes from Remix. This was definitely one of those magic outfits that came together in just over a week.
I looked over some of the 1870s/80s patterns in Patterns of Fashion and Cut of Women's Clothes, but I had to alter it so much I can't really point to one that's similar anymore.
The hammer was the hardest part for me since this is definitely out of my comfort zone. Thankfully a good friend and my husband came to the rescue and helped me figure out supplies and assembly (which happened in about two days at the last minute). The base is a sonotube with wood veneer from a craft store gorilla glued around it. The ends are a decorative block of wood we found, the handle a dowel rod, the topper is from a curtain rod, and then the copper straps are electrical tape with fabric tacks! A quick staining the night before I left and I was good to go (aside from the fact that my car smelled like stain for the 7 hour trip).
First time trying to draft my own corset from scratch not based on a historical pattern. I ended up with 12 pieces per side and it fits so perfectly! It's just one layer of coutil with the seams top-stitched and folded over to make casings. I boned it with the plastic German Whalebone because the zipties I had weren't long enough. I need to make more modern corsets now...
It's hard to tell with all of the layers on top, but I've got really high hips and a very abrupt waist to hip change which makes many corset styles painful (stays are great though). I finally managed to get this design to work. Not a ton of waist reduction, only about 2-3" when first lacing in.
The bodice I decorated with jet black beads on the shoulders that have fallen off of a deteriorating Victorian mantle I have for parts (black silk has no hope) and some brooches and buttons I already had around. The obsession with sparkly jewelry is genetic in our family, so I've got a good collection!
And then there's the wig. I purchased the wig and two extensions from Arda Wigs (Glinda and long curly clips). The extensions were first cannibalized for strands of hair to put a lace front on the wig. I do not have a high forehead and putting a regular wig far enough forward to cover my now dark hair just looks weird apparently. Next time I'm just buying a pre-done lace front style. The two extensions were then dipped into some Rit dye to try to get an ombre effect. A lot of bobby pins later I managed something that is vaguely based on some 1870s hair fashions with loads of extra curls on the sides. Oh, and the adorable hat has two silk velvet pompoms on it. For some reason, that was the most satisfying bit of the project!


I absolutely LOVED this outfit! The fabric find was awesome....you had an "evil clown" effect going that I loved.
ReplyDeleteFantastic costume. Looks like you had fun. You can see the passion that you put into it.
ReplyDeleteLovely dress! And how exciting to be able to design your own fabric! Looking forward to your notes on the construction of the dress.
ReplyDeleteSilk Chiffon Fabric NYC
kadın topuklu ayakkabı fiyatları
ReplyDelete