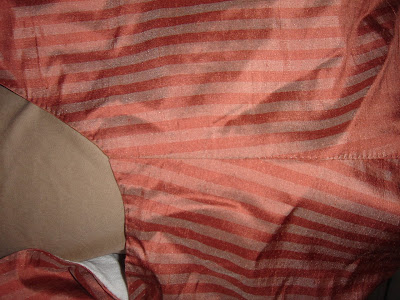
It's a bit hard to see, but you might notice the lack of boning casings showing. This pair was originally made of silk, but must have worn too much because it's been covered over in cotton. So, I will still be making mine visible. The binding is green silk ribbon. I'll probably use cream so it doesn't show under any of my clothes, but maybe I'll use a color to lace the front for fun, since I can always change it out. The difficulty will be finding a good cording to lace the back. Now that I got a glimpse of those and was able to examine a few others stored in back, I'm going to pick back up on my pair and start stitching channels. I had been concerned with size since the original channels are all 1/8", but they were baleen. Oak won't hold up to that, and even though I've managed to find spring steel that size, I'm afraid it won't have the resistance to permanent bending I need. So, seeing a late pair of stays with mixing of 1/4" and 1/8" channels today I feel confident that I can mix in 1/4" steel correctly.
Wednesday, December 17, 2008
Stays Original
Just a quick add-on to my stays postings. I took a tour around the Dewitt Wallace Museum today, and lo and behold they had the stays I'm building up in the Quilted Fashions exhibit. There's not much light, but you can get an idea:
Sunday, December 14, 2008
Cut-away Gown History
Here is the infamous portrait by Ducreux that shows a beautiful example of the style. While this gown was most popular in the 1780s, it did actually show up in the colonies in the late 1770s and continued to be worn throughout the '90s as well.
Obviously, most of the gowns seen in portraits are made from silk taffeta, but a cotton print would be lovely as well. For some reason, I seem adverse to linen, but I can't give a particular reason why. Both solid colors and smaller stripes are acceptable. The large 2 or 3" stripes seen earlier in the century would have been out of style by this point. You can also choose a contrasting fabric for the leftover zone in front and even the petticoat.
In terms of the actual cut, there are a number of different looks to the front and to the sleeves. At this point the back would have usually been quartered rather than an English style. You could cut the CB pieces flat on bottom and connect them to the skirt to give that illusion of continuance without actually pleating the bodice if wanted.
Above you can see three examples of both front cut and sleeves. Simplifying it, you can choose a straight angle or to curve it away. From there, whether it will be a split zone piece or not. And if it will be whether you fasten by pins, hooks, or buttons. You can also add a tab, as I did, across the top of the front. The sleeves can be the regular elbow length style, full length (you may choose to have the wrist area button since they're tightly fitted), or even cap sleeves over a contrasting long sleeve. It gets more complicated when building, but that will come later.
The back, as talked about, is shown with two different styles of quartered backs.
Of course, in this period especially, accessorizing can make all of the difference. Be it through a sash or ribbon around the waist, a crossed over kerchief, lace, or the ever popular hedgehog hair with ribbons, feathers, or over-the-top hat. It's easy to see, from some of the portraits below how this style of gown evolved into the separate over-gown near the end of the century.
Monday, November 3, 2008
Coming Soon.....
Hello again! I am finally managing to get out from under the process of moving and back to the clothing. Unfortunately I don't have much to post today, but things will be coming soon. I'm finishing the trim on my Caraco, still working on a Robe a l'Anglaise, looking for buttons for my 1790s jacket, and should get to a pet-en-l'air by Christmas. I'm also attending two workshops this month: 1780s gowns in two weeks and stays the week after. I'll make sure to take lots of notes and pictures and try to get up some comprehensive information and instructions soon after.
On a side note, I did get to attend a lecture by Caroline Weber on her book "Queen of Fashion". Slap me on the wrist, but I haven't read it yet. I promise I will soon! I was impressed to find that she has origins in French history and self-taught the fashion history just for this book. Listening to her rattle off French terms made me very glad to have minored in it! Some of the most interesting information she discussed were the Poufs. That oddly wonderful three foot tall hairstyle which acted as a 18th century billboard. Now, I've seen images of women with ships on their poufs, but that was only the beginning! Those were termed "Poufs de Circumstance" having to do with current events or politics. On the other side are your "Poufs de Sentimente". This could be A la Trouche, with ostrich feathers, or even A la jardinier, with vegetables! She mentioned one headdress made of a cabbage surrounded by root vegetables. I can't imagine the weight of that!
There was much more discussed on Marie Antoinette's phase with wearing men's riding wear, the infamous portrait in the gauze gown, the colors of the revolution, her fashion designer Rose Bertin, and her final days in jail. I was told, if you speak French, to check out the book "La Modiste de la Reine". Now, if I can just find it.
Monday, September 22, 2008
Bodice Assembly
When putting together a woman's jacket or a bodice for a gown, the assembly techniques are generally the same. I've already shown in a previous post how to lay out the front pieces and stitch them together. Leave the seam allowances at the ends un-sewen (shoulder seams, side seams) so you can fold it over later.
When stitching the back seam I generally use a back-stitch on the fashion fabric. The lining can be done the same or with a butted edge. For that you fold over the seam allowance on both sides, put wrong to wrong side and do a very tiny whip stitch. Grab just a few rows of the weave each time. Don't stitch too tightly, but do keep it snug. When finished you pull the two sides apart a bit and the seam should be able to lay out flat (hence why not too tight of stitching). This same technique can also be used on selvages and I've seen it on shirt seams like that. If you're doing a jacket, you can put the fashion and lining backs together and stitch around the neck and bottom hem up to seam allowances.
The sides can also be done a few different ways. I like the method I found in Costume Close-Up. Fold over the front fashion fabric and line it up on the back pieces. You will stitch a spaced back stitch very close to the edge through all three layers. The front lining will then be folded towards the seam and stitched down, enclosing the raw edges. You can also use the same technique explained for the back seam, but use the back stitch on the fashion fabric seam instead.
Sleeves use the same techniques as the side or back seams (underhand whip the hem) and I've seen the armscye left raw and whipped, with all allowances sandwiched in the sleeve, and where it's inside the bodice. It's all up to you and whether your fabric frays and if you want to see stitches externally (and where).
Exterior of a side seam for a 1790s jacket I'm building. Shows the spaced back stitch on the side seam (horizontal in picture) and the underhand on the bottom hem.
Repeat imagery of the ever so useful backstitch I keep mentioning.
The overhand stitch. Same usage as underhand, but shows up as a small dot on both sides. Just up and down with the needle very close together.
Similar to over hand, but as a seam. Resembles the spaced back stitch in form and function (just doesn't back up on the small visible stitch). Use for side seams or armscyes.
The butted and whipped seam. Not the prettiest of examples, but it would be the lining anyway. (Also used to piece together stays, but I'll be doing a workshop on those in November).
Just like modern stitching you need to find a technique that works for you. Every extant garment is different and there are probably many stitches we haven't ever seen!
My caraco is nearly completed (one more cuff, then some details). I'm hoping to do a pair of mitts soon, a 1780s gown workshop, a stays workshop, and eventually a riding habit workshop in January. I move in two weeks, so if I disappear for a while I promise I'll be back!
Wednesday, September 10, 2008
Caraco 3
I apologize for the delay, things have been hectic with preparing to move soon. Hopefully I will have more time for projects once October comes around.
I have nearly completed the caraco and hope to try it on and take pictures this weekend. In the mean time, here are a few up-close images of construction techniques. These can be used in any style of jacket or the bodice of a gown (or anywhere else you can imagine!).
This shows an interior shot of how to lay the lining to the fashion fabric. In case of a jacket, you would use this along the exterior edges; front, neckline, bottom hem, and sleeve hems. Simply fold over the fashion fabric at the seam allowance line, lie the lining on top and fold back the edges a small amount (1/16") past the fashion fabric. I usually pin the lining in the middle area to make sure it doesn't shift. The other edges I baste together flat (temporarily in some cases).
Here's a shot of how fold the corners. I recommend the right side (where the fashion fabric shows more) used at the bottom as the front and as the neckline on top.
This shows the small "whip" stitches I described in one of the previous posts. You can also do a spaced back stitch leaving a long stitch on the wrong side or do it pretty and make it look like a dot on both sides. I recently did a workshop on hand stitching at work and will bring my book home this weekend to post up here.
In the near future I will try to post from the workshop, more comprehensive instructions on my caraco, roll hemming kerchiefs, and soon to start patterning and building my next pair of stays!
Thursday, August 14, 2008
Hand Sewing Techniques
I'm going to try to cover some of the basic stitches and their uses. There are so many other stitches and I really recommend purchasing Kannik's Lady's Guide to Plain Sewing books. I'm mainly covering the types that I'm going to be mentioning a lot. I noticed that one of the hardest things to find information on is what stitch is proper to use where. I'll try to mention a few of the most common uses and they'll come up later in instructions.
One of the best tips I have gotten about 18th century hand sewing is that today we stitch a seam and open it up. Back then, they would most often fold the seams then stitch. I'll explain it more further on.
Running Stitch
The most basic of stitches. Up, down, up, down. That's it. On average, there would be about 8-10 stitches per inch. That depends mostly on how much work the seam will get. If you're doing a side seam for a petticoat, you can run a little longer. This can be used in open seams or as a basting stitch. Yes, I did just say they folded then stitched, but some seams like petticoat sides or center back on some jackets couldn't be. However, in both cases, I'd recommend a back stitch or a combination stitch for strength.
Back Stitch
Probably the most useful stitch to learn. You come up a stitch length past your last stitch and then go down meeting with that last stitch. It creates a very strong seam. Again, about 8-10 per inch on average. If you do a few running stitches, then one back stitch it's known as a combination stitch. Combinations are great for petticoat side seams where you want speed and strength. Back stitches can easily create open seams or lapped seams. For lapped seams you spread out the stitch showing a short "prick" on the outside and a longer stitch inside. Fold over the seam allowance on one piece and lay it on top of the other then stitch near the edge (1/8"). If you're doing a lined piece you can fold the outer layer on one side, lay it on both layers from the other side, stitch, then fold the last lining piece over to hide the edges. I'll show examples when I get to jackets. The spread out back stitch can also be used along edges to keep them from rolling, attach skirts on gowns, or stitch on trim and robings.
Point a Rabattre/whip stitch/plain hem
Whatever you call it, this stitch can be used just about anywhere. You can use it to hem, roll edges, and stitch in linings. I show two uses below, the first as a way to stitch a lining in at the edge and the second as a rolled edge. I'll expand on the lining use at a later point. Keep in mind this stitch is small as well, only showing a small prick on the outer side.
If you roll two layers together and make sure to go through both on the prick stitch then it's a Mantua Maker's seam which is a fast way to seam and finish edges at the same time!
If you do a back or running stitch with the two edges off set, fold over the allowance twice then whip it down to one side it's a flat felled seam.
There are many more combinations of these three stitches as there are many other stitches. Again, I recommend the Lady's Guides. They're inexpensive and probably the most useful books you will own if you want to hand stitch your clothing. I'll be referencing the use of these stitches in all of my instructions.
Saturday, August 2, 2008
Caraco 2
Tuesday, July 29, 2008
Caraco 1
Here is the first of my on-going project updates. This one is a caraco jacket which is featured in Fashion in Detail. What makes it unusual is that the back (skirt and all) and the sleeves are all one piece. That's right, no shoulder seam. The back is formed by tucking, according to the book. I took the idea to the Milliner's shop at Colonial Williamsburg and mostly got "good luck!" from Janea. After starting to drape it, I realized that my 45" wide fabric wasn't going to cut it. Despite always hearing about how narrow fabrics were, there were apparently a few over 45". So, I slipped an invisible seam in the tucks on the skirt area. Looking at the print, Iit definitely is one piece, so no misunderstanding there. I used that as a basis for angles in draping as well. All in all, the mock-up went well with only a few alterations I'll mention below. I have no clue if I did it correctly, but it looks right.
First off, my front was a bit too large, so that's been pinned in. I still have to shape the stomacher, tabs, and cuffs. The robing is also gaping at the shoulders, but I have alterations to do in back that will fix that. The hem line is also too low in front.
The back neck line will be lowered, fixing the gap issue on the robings. I'm also moving the "dart" that creates a waistline to more of an angle. The side seams are also getting a new curve, but it's hard to see that issue here. I had to cut out the excess fabric on the upper back seams since the amount pleated into the skirt was too bulky to hide further up. That's my only question of authenticity at this point.
I've got the printed cotton (see petticoat in previous post) and am just waiting on getting a lining material before cutting. I might take it into work tomorrow to have it checked over before going on.
To go with this I'll be making a kerchief for modesty's sake. Since it's a caraco, I have the option of using the tabs in front to tuck it down, making a separate stomacher optional. I'll gather some more info up on caracos for a later post.
Saturday, July 26, 2008
Perfectly Pleated Petticoats
Yet another essential part of the 18th century woman's wardrobe was the petticoat. You can't go around wearing breeches after all! They can be made from linen, cotton, or silk. They can be made to match a gown or as a separate piece. They attach at the top by splitting in half
(also allowing for openings to reach the pockets) and the front and back have ties which wrap around the waist separately. The most complicated part of a petticoat is its pleating. Up until 1780 I'd recommend 1/2" pleats, which is what I use in the formula below. After that, you can choose to do smaller pleats. The same progression occurred with the gown as I'll talk
about another time.
The first step is do to some measurements. Put on your shoes for this. First, you'll need your waist. Next measure from the center front of your waist line to the floor, then side, then back. There might not be much difference there, I'm only 1" shorter in front. Dipping down the top before pleating means I don't have a curvy hem. Particularly useful when wearing hoops and the difference is great.
When purchasing your fabric, the first thing you need to know is how many panels you will require. Most petticoats use either two or three widths of fabric; 100" to 120" is a good normal range. A finished petticoat should be about 3" off the ground and the hems were often narrow (1/4" turned twice) or faced with tape. If you're going to be working in the petticoat (ex. cooking over the fire) a couple inches shorter is fine.
Once you've purchased and washed the fabric, it's time to cut the panels. Cut across at the fabric the panel length we determined earlier (side to floor minus 1"). If you have three panels, this process will be a bit different, so skip ahead to your own section below. Otherwise we need to curve the top. First, find the difference between the front and side measurements. Mine are 39" and 40", so I have a 1" difference. Find the middle point at the top of one panel. Mark down that difference and mark half-way between the center point and the side at top. You'll create a curve as shown below.
For two panels, you'll stitch up the side seams stopping 9" from the top. By hand, I use a combination of running and occasional back stitches. The top 9" you'll fold the seam allowance back, then fold the edge under to hide it (like a roll hem). Use small whip stitches to tack it down. I also recommend putting a thread bar at the bottom of opening to keep the stress of the seam.
For three panels, stitch all the way up all three seams. By hand, I use a combination of running and back stitches. One seam will sit at center back and the other two will end up on your side fronts. Find your center front point at the middle of the front panel. Match the center back and center front points. Lay it out flat and the folds should lie where your side openings will be. Mark and cut a 9" line straight down from the top and these points. Roll and hand-stitch the raw edges back. Around the bottom do a hand button-hole stitch and a thread bar.
Next comes the pleating. Find your waist measurement and also measure the front or back half of your petticoat. Before you start, is this to go with a gown or is it separate? If you're going to use a gown, you'll have a 5" pleat at center front. Otherwise, I recommend a 3" pleat. You'll see two different formulas, the first one for the 5" and second one for the 3".
"Waist" is your total measurement
"Fabric" is just the front or back half of your petticoat
Round to the nearest 1/8" for "per pleat"
Front
Waist = _____ / 4 = _____ - 2.5 = _____ x 2 = _____ pleats (gown)
Waist = _____ / 4 = _____ - 1.5 = _____ x 2 = _____ pleats
Fabric = _____ / 2 = _____ - 2.5 = _____ / pleats = _____ per pleat
Fabric = _____ / 2 = _____ - 1.5 = _____ / pleats = _____ per pleat
Place pin center front (CF). Place a pin on either side either 2.5” or 1.25” out from CF.
Next pin goes ______ (per pleat) further out. Place one 1/2” in from last pin.
Repeat until correct number of pleats has been marked. The last 1/2” should be at the very end.
If the last pleat doesn’t end in the correct place, determine the amount off. It should be less than amount per pleat, but more than 1/8”.
Subtract or add 1/8” to pleats working from the end in until it evens out. (If you’re 1/2” over, the last four pleats need to be 1/8” less than originally planned.)
Fold pin to pin with pleats facing out, leaving larger CF pleat as measured.
Back
Waist = _____ / 2 = _____ pleats
Fabric = _____ / 2 = _____ / pleats = _____ per pleat
Place pin CB.
Next pin goes _____ (per pleat) further out. Place one 1/2” in from last pin.
Repeat until correct number of pleats has been marked.
Adjust the last pleat distance to 1 1/2” including the 1/2” marking.
Move sets according to front directions to correct.
Fold pin to pin with pleats facing inward.
Do a running stitch 1/4" from the top to fasten the pleats down.
Cut two strips of 1" tape (cotton twill or linen) half of your waist size plus two tails of 30" each. Fold it in half over the raw edge on top and stitch down. Make sure to roll and stitch the ends of the tape.
To hem, try it on and make sure it's even with the floor. If not, have a friend go around and mark 3" above the ground with pins. Leave 1/2" past your finished length. Roll and stitch with a slip stitch so you won't catch it on your heels.
Monday, July 21, 2008
Pockets!
Today I'm going to give instructions on building a pocket. They are probably the most simple of 18th century garments, so this would be a good place to start or to practice hand stitching.
Once you've determined size you can rough out a pattern. Just use a straight edge and round the bottom corners and it will look fine. You're going to need three layers; one of fashion fabric and two of a sturdier linen. You'll also need some 1/2" cotton twill to bind it and 1" twill for the waist band. You can bind in a fabric as well. For fabric binding use 1" and turn the edges under 1/4" each.
After you've cut out the three layers, take the top two and cut a slit down the middle ending about half-way (not more than 9"). I'd recommend basting around those two layers before cutting so they don't shift around. Next, you'll bind the slit with the 1/2" twill leaving the ends raw. Combine all three layers, baste and bind around the outside edge. Finish the top with the 1" twill. The length should be enough to comfortably tie around your waist. Make sure to finish the ends of the tape by rolling them 1/4" twice and stitching.
If you're doing two pockets, measure out the twill the same. Tie it around your waist and determine how much space you need in the back between the two pockets.
This is a great project to take with you when re-enacting so you can practice embroidery or hand stitching. No one has to see it but you, so it's fine if it's not pretty!
Saturday, July 12, 2008
Overview
One of the first things to remember about the 18th century is that fabric is expensive, but labor is not. If you aren't looking to portray the upper class, stick with linens, cottons, or wools. My recommendation is to check with sutlers if you don't know what to look for. Most places (like Wm Booth Draper and Burnely & Trowbridge) will gladly talk to you over phone or email about fabric choices. If you are going high class, silk taffeta is your best bet. Dupioni, while cheaper now, isn't correct. The safest bets are solid colors, rather than prints. There are many incorrect prints out there that take a trained eye to spot and there are some garments where prints aren't always correct. Here is a basic list of garments for men and women.
Women
Shift: the basic linen undergarment which allowed for easy cleaning and kept outer clothing clean.
Stockings: over-the-knee socks held up by garters or ribbons. Came in many colors, some with decorative clocking.
Stays: not a corset. These gave you a conical shape without crushing you. Half or fully boned, straps or no, front or front/back laced.
Pockets: hanging pouches tied on around the waist, separate from the other garments, accessible through slits in the petticoat.
Side Hoops: sometimes called paniers in modern terms, give you the wide hips without the fuss of a large hoop petticoat. Very popular in the '70s. You could also use these as large pockets. Replaced by bum and hip rolls in the '80s.
Petticoat: pleated skirt that would be worn under the gown or jacket. Under-petticoats were made of less expensive material and could add warmth or hide lines from hoops. Usually about 3" off the ground.
Jacket: there are many different styles of jacket. These were most commonly worn by both working class and upper class, though in different styles. Some fitted, some unfitted and held in by the apron.
Gown: worn by every class. A robe a l'Anglaise has a fitted back while a robe a la Francaise has a loose or "sack" back. More money meant more trim. All classes used ruffles or kerchiefs around the neck for modesty.
Cloak: worn by women and men for warmth. Made of wool and came with or without a hood.
Mantelet: a shortened cloak usually made from satin, silk, or lace. It was used for warmth, but often indoors or on cool days.
Robe a la Polonaise: a particular style of gown with gathered up skirts, loose fronts, and false waistcoat. Many styles of gowns have polonaised skirts, but are not this specific style.
Brunswick: a sacque-back style jacket, often used for travel, that has a hood and removable long-sleeves.
Riding Habit: ensemble of petticoat, riding shirt, waistcoat, and masculine jacket.
Mens
Shirt: similar to today's shirts, but with a front slit rather than fully open. Always loosely fitted and often long enough to serve as underwear.
Waistcoat: Buttoned vest worn by all classes. Some have sleeves which could be sewn in or tied on.
Jacket: Similar to waistcoat in cut and length. Often had sleeves, but not always. More practical than a full-length coat for work and often worn over a waistcoat.
Breeches: Knee length pants that buttoned down to a buckled, buttoned, or tied cuff on the leg. The top was also buttoned and usually had a fall-front. The back was looser to allow for room to ride a horse. It also laced closed in the back at the waistband to allow for adjustment.
Coat: Knee-length, full-skirted (narrowing with time). Worn over waistcoat by all classes.
Cloaks & Stockings: generally the same as women's wear.
Shoes: Men's are usually made of leather, exception in some dance pumps and slippers. Women's could be fabric covered or leather (remember leather is the cheap option at this point).
There are a lot of items and terms I haven't covered, but this gives you the basics.
Friday, July 11, 2008
Constructed pieces 2
The second and final installment of my previously made items. Next time I'll try to give an overview of what an 18th century outfit for men and women would involve. After that, I'll go from the skin out with full descriptions and instructions.
First full outfit that I built in 18th century. Everything is completely hand sewen. The jacket is a cotton print lined with linen and laced with silk ribbon. The mitts are left over linen pieces. The outer petticoat is linen which I dyed. The cap has a split ruffle and is also of fine linen. There is also an underpetticoat of a tighter weave linen, a bum roll, and a fine linen shift. All of these pieces will have instructions coming later. The hat, while period correct, is of a color that is not verifiable as accurate. Black and brown survived, but navy, if it existed, did not.
Pair of fully-boned stays. Made from three layers of linen. Outer two form channels while inner is a loose linen sewn in last. This allows the wearer to replace the most easily soiled layer. Boning is all reed. All stitching is done by hand. Channels are made using a point to point back stitch and seams are top stitched. The binding is linen tape. I'm currently fixing up these stays to be bound with leather as well as shortening them to fit more appropriately. I will eventually go back and do a full step-by-step instruction on this project or possibly on a later pair of stays.
Thursday, July 10, 2008
Constructed pieces 1
First posting of previously constructed pieces. I'll continue to add to this over the next few days. Some will return later to be used in full explanations and instructions of that particular style of item. If there's something you want me to go more in depth on sooner, please ask! In addition I should start posting in progress projects soon.
Wednesday, July 9, 2008
Greetings
To begin with, I'm going to cover the list of projects to come. Hopefully I'll get all of my photos of previous projects posted very soon!
In process:
Close-front Robe a l'Anglaise...... ready for trimming
1790s silk jacket...... cut out
Cotton Robe a l'Anglaise...... fabric purchased
Future:
Cotton gauze embroidered petticoat
2nd pair stays
Masquerade gown a la Hannibal crossing the Alps
Riding Habit
1780s gown from Workshop
I'm going to start compiling tips and tricks as well as instructions from previous projects soon. If there's anything you want to know, please ask! If I don't know, someone I work with will or I'll just go to Linda Baumgarten!